Upgrade Python to latest version (3.13) on Ubuntu Linux or WSL2
Last Updated: 2025-01-06
Ubuntu both Desktop & WSL2 Linux systems come with Python installed by default, but, they are usually not the latest. This is a short guide on how to upgrade your Python to the latest version (Python 3.13) on Ubuntu Linux and solve associated issues.
I am using Ubuntu 22.04 on WSL2, but this should work on any Ubuntu version.
First, check the version of Python installed on your system run
python3 --version
pythonkeyword is used for Python 2.x versions which has been deprecated
Updating Python to the latest version
Ubuntu's default repositories do not contain the latest version of Python, but an open source repository named deadsnakes does.
Step 1: Check if Python3.13 is available for install
First, update your system by running
sudo apt update && sudo apt upgrade -y
sudo add-apt-repository ppa:deadsnakes/ppa
sudo apt update
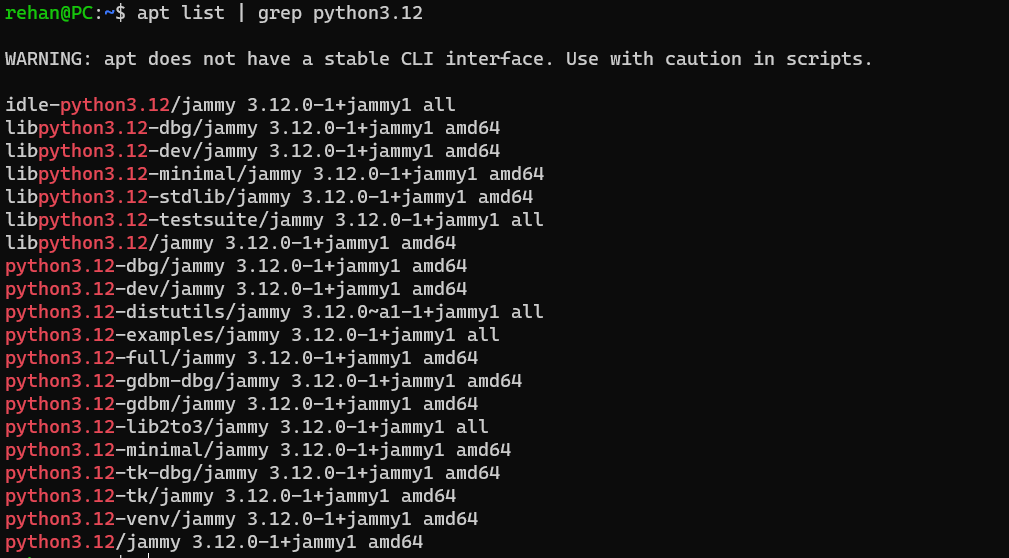
Check if Python 3.13 is available by running
apt list | grep python3.13
This will produce the below result, if you see python3.13 it means you can install it

If you see something similar to the above, it means you can install Python 3.13.
Step 2: Install Python 3.13
Now you can install Python 3.13 by running
sudo apt install python3.13
Now though Python 3.13 is installed, if you check the version of your python by running python3 --version you will still see an older version. This is because if you are using Ubuntu Desktop, the default Python is needed by the system and changing it will break your system.
Step 3: Run Python 3.13
You can run Python 3.13 by running
python3.13 --version
The right way to run Python 3.13 On Linux Desktops is by using a virtual environment.
E.g. you can create a new virtual environment by running
python3.13 -m venv env
and activate it by running
source env/bin/activate
Now you can run python --version and you should see the latest version of Python as the output.
Extra
If you really, really, really don't want to type python3.13 every time you want to run a file, you can create an alias.
If you are using bash, run
echo "alias py=/usr/bin/python3" >> ~/.bashrc
echo "alias python=/usr/bin/python3" >> ~/.bashrc
Or, if you have oh-my-zsh installed, you can avoid typing out python3 by running
echo "alias py=/usr/bin/python3" >> ~/.zshrc
echo "alias python=/usr/bin/python3" >> ~/.zshrc
After restarting your terminal, you can run your Python apps with py or python.
WSL2 Only: Set Python 3.13 as default
Steps beyond here are tested on WSL2, it may break your Ubuntu/Linux desktop.
Changing the default alternatives for Python will break your Gnome terminal. To avoid this, you need to edit the gnome-terminal configuration file.
Open the terminal and run:
sudo nano /usr/bin/gnome-terminal
In first line, change #!/usr/bin/python3 to #!/usr/bin/python3.8. Press Ctrl +X followed by enter to save and exit.
Then save and close the file.
Next, update the default Python by adding both versions to an alternatives by running the below
sudo update-alternatives --install /usr/bin/python3 python3 /usr/bin/python3.9 1
sudo update-alternatives --install /usr/bin/python3 python3 /usr/bin/python3.13 2
Now run
sudo update-alternatives --config python3
Choose the selection corresponding to Python3.10 (if not selected by default). 
Now run python3 --version again and you should see the latest Python as the output.
Fix pip and disutils errors
Installing the new version of Python will break pip as the distutils for Python3.13 is not installed yet.
Fix Python3-apt
Running pip in terminal will not work, as the current pip is not compatible with Python3.13 and python3-apt will be broken, that will generate an error like
Traceback (most recent call last):
    File "/usr/lib/command-not-found", line 28, in <module>
        from CommandNotFound import CommandNotFound
    File "/usr/lib/python3/dist-packages/CommandNotFound/CommandNotFound.py", line 19, in <module>
        from CommandNotFound.db.db import SqliteDatabase
    File "/usr/lib/python3/dist-packages/CommandNotFound/db/db.py", line 5, in <module>
        import apt_pkg ModuleNotFoundError: No module named 'apt_pkg'
To fix this first remove the current version of python3-apt by running
sudo apt remove --purge python3-apt
Then do some cleanup
sudo apt autoclean
DO NOT RUN sudo apt autoremove as it will remove several packages that are required. This may break your system if you're using GUI, if you're on WSL2 you can proceed.
Finally, reinstall python3-apt by running
sudo apt install python3-apt
Install pip & distutils
Running pip will still throw an error pip: command not found. We need to install the latest version of pip compatible with Python 3.13.
Also, if try to manually install the latest version of pip, it will throw an error like
ImportError: cannot import name 'sysconfig' from 'distutils'
(/usr/lib/python3.13/distutils/__init__.py)
Or you might also see an error stating No module named 'distutils.util'. This is because the distutils module is not installed yet, to install run the below command
sudo apt install python3.13-distutils
Now you can install pip by running
curl https://bootstrap.pypa.io/get-pip.py -o get-pip.py
sudo python3.13 get-pip.py
If you get an error like
bash: curl: command not foundthen you need to install curl first by runningsudo apt install curl
Now you can run pip and you should see the output of pip --version
Fix pip-env errors when using venv
When you try to create a new virtual environment using python -m venv env, you may into the following error.
Error: Command '['/path/to/env/bin/python3', '-Im', 'ensurepip', '--upgrade', '--default-pip']' returned non-zero exit status 1
You can fix this by reinstalling venv by running
sudo apt install python3.13-venv
All should be done now. It is complicated, but this is how you update Python to latest version.