Run Selenium and Chrome on WSL2 using Python and Selenium webdriver
Selenium combined with Headless Chrome used to be great tool for creating automated UI tests for web applications.
Google recently launched Chrome for Testing, a version of Chrome specifically designed for automated testing. It is available for Windows, Linux and Mac.
This solves a major issue that developers had with finding a compatible versions of Chrome and Chromedriver.
With Selenium libraries, Python can be used to create and run automated browser-based tests & tasks. This guide will show you how to install, configure and run Selenium and Chrome on WSL2 using Python and Selenium webdriver.
Step 1: Install WSL2
On Windows 10 version 2004 or higher (Build 19041 and above) or windows 11, run the below.
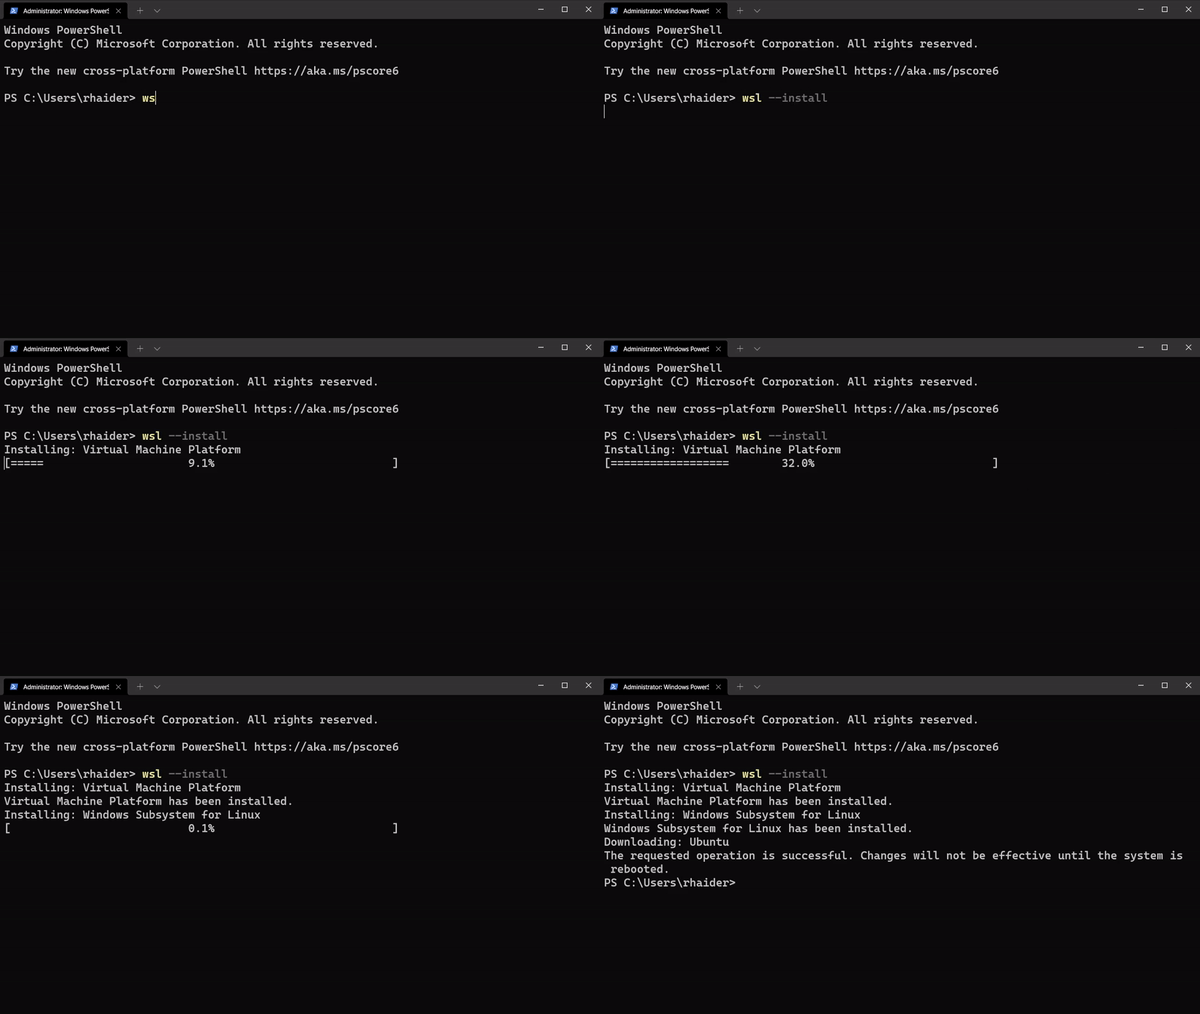
wsl --install
This will take care of all the steps required, i.e.
- Enable Windows Virtualisation Layer and WSL2
- Update the Linux kernel to the latest version
- Install the default Linux distribution, i.e. latest Ubuntu (Currently Ubuntu 20.04)

Then type wsl in your terminal and press enter to login to WSL2.
NOTE: All codeblocks below are formatted as multi-line commands so the entire block needs to be copy pasted and not line by line.
Ensure you go to your home directory, update the repository and any packages
a) Change the working directory to the user home directory.
cd "$HOME"
b) Update the repository and any packages
sudo apt update && sudo apt upgrade -y
Step 2: Install latest Chrome for Testing (for Linux)
This version of Chrome is not available in Ubuntu's official APT repository, so we will download the zipped files directly from Google and install it.
a) Download the latest Chrome file
meta_data=$(curl 'https://googlechromelabs.github.io/chrome-for-testing/\
last-known-good-versions-with-downloads.json') /
wget $(echo "$meta_data" | jq -r '.channels.Stable.downloads.chrome[0].url')
b) Install Chrome dependencies
sudo apt install ca-certificates fonts-liberation \
    libappindicator3-1 libasound2 libatk-bridge2.0-0 libatk1.0-0 libc6 \
    libcairo2 libcups2 libdbus-1-3 libexpat1 libfontconfig1 libgbm1 \
    libgcc1 libglib2.0-0 libgtk-3-0 libnspr4 libnss3 libpango-1.0-0 \
    libpangocairo-1.0-0 libstdc++6 libx11-6 libx11-xcb1 libxcb1 \
    libxcomposite1 libxcursor1 libxdamage1 libxext6 libxfixes3 libxi6 \
    libxrandr2 libxrender1 libxss1 libxtst6 lsb-release wget xdg-utils -y
c) Install/Unzip Chrome The downloaded zip file contains unpackaged Chrome binary files. We just need to unpack them.
unzip chrome-linux64.zip
c) Check if you Chrome is working
./chrome-linux64/chrom --version

Step 3: Install compatible Chromedriver
Thankfully, the process of downloading and installing Chrome driver has become much simpler. We can use the same JSON API to get the compatible version of Chromedriver.
b) Download the latest Chromedriver
meta_data=$(curl 'https://googlechromelabs.github.io/chrome-for-testing/\
last-known-good-versions-with-downloads.json') /
wget $(echo "$meta_data" | jq -r '.channels.Stable.downloads.chromedriver[0].url')
d) Unzip the binary file
unzip chromedriver-linux64.zip
Step 4: Configure Python and Install Selenium
Selenium webdriver is available as a Python package, but before installation we need to do some prep.
Configure a Python virtual environment
Next, we need to install venv, choose the Python version based on what you have installed.
sudo apt install python3-venv -y
Then create a virtual environment
python3 -m venv .venv
Finally, activate the virtual environment by running
source .venv/bin/activate
You should see your terminal change to the below with (.venv) in the prompt.
Install Selenium
After activating the virtual environment, install Selenium using the pip command.
pip install selenium
It is necessary to activate the Python virtual environment by running
source .venv/bin/activatebefore executing the above command
Step 5: Run Selenium
Finally we're ready to start running our automated tests. We write a simple Python script to run Selenium and Chrome/Chromium.
Create a new folder, selenium and open VSCode by running the below
mkdir -p "selenium" && cd "selenium" && code .
a) The Python program
"""
# Filename: run_selenium.py
"""

## Run selenium and chrome driver to scrape data from cloudbytes.dev
import time
import os.path
from selenium import webdriver
from selenium.webdriver.chrome.service import Service
from selenium.webdriver.common.by import By
from selenium.webdriver.chrome.options import Options

## Setup chrome options
chrome_options = Options()
chrome_options.add_argument("--headless") # Ensure GUI is off
chrome_options.add_argument("--no-sandbox")

# Set path to chrome/chromedriver as per your configuration
homedir = os.path.expanduser("~")
chrome_options.binary_location = f"{homedir}/chrome-linux64/chrome"
webdriver_service = Service(f"{homedir}/chromedriver/stable/chromedriver")

# Choose Chrome Browser
browser = webdriver.Chrome(service=webdriver_service, options=chrome_options)

# Get page
browser.get("https://cloudbytes.dev")

# Extract description from page and print
description = browser.find_element(By.NAME, "description").get_attribute("content")
print(f"{description}")

#Wait for 10 seconds
time.sleep(10)
browser.quit()
b) Run the program
Go back to your terminal and type python3 selenium/run_selenium.py

Creating a script to automate the process
We can merge the above steps to create a simple bash script to help you automate this entire process. Save this to a file named install-selenium.sh and then make it executable by running chmod +x install-selenium.
#!/usr/bin/bash

echo "Changing to home directory..."
pushd "$HOME"

echo "Update the repository and any packages..."
sudo apt update && sudo apt upgrade -y

echo "Install prerequisite system packages..."
sudo apt install wget curl unzip jq -y

# Set metadata for Google Chrome repository...
meta_data=$(curl 'https://googlechromelabs.github.io/chrome-for-testing/'\
'last-known-good-versions-with-downloads.json')


echo "Download the latest Chrome binary..."
wget $(echo "$meta_data" | jq -r '.channels.Stable.downloads.chrome[0].url')

echo "Install Chrome dependencies..."
sudo apt install ca-certificates fonts-liberation \
    libappindicator3-1 libasound2 libatk-bridge2.0-0 libatk1.0-0 libc6 \
    libcairo2 libcups2 libdbus-1-3 libexpat1 libfontconfig1 libgbm1 \
    libgcc1 libglib2.0-0 libgtk-3-0 libnspr4 libnss3 libpango-1.0-0 \
    libpangocairo-1.0-0 libstdc++6 libx11-6 libx11-xcb1 libxcb1 \
    libxcomposite1 libxcursor1 libxdamage1 libxext6 libxfixes3 libxi6 \
    libxrandr2 libxrender1 libxss1 libxtst6 lsb-release wget xdg-utils -y


echo "Unzip the binary file..."
unzip chrome-linux64.zip


echo "Downloading latest Chromedriver..."
wget $(echo "$meta_data" | jq -r '.channels.Stable.downloads.chromedriver[0].url')

echo "Unzip the binary file and make it executable..."
unzip chromedriver-linux64.zip

echo "Install Selenium..."
python3 -m pip install selenium

echo "Removing archive files"
rm chrome-linux64.zip  chromedriver-linux64.zip

popd
Alternatively, this script is also available on GitHub as a repository.