Mount Amazon FSX Lustre filesystem and attack to AWS EC2 instance
A step-by-step guide to mount Amazon FSX Lustre filesystem and attack to AWS EC2 instance
On this page
Apart from Elastic File System (EFS) that uses Network File System (NFS), Amazon also provides other types of distributed filesystems on AWS under the Amazon FSx service, such as:
- Amazon FSx for Windows File Server: A fully managed Windows file system that is accessible from Windows and Linux instances.
- Amazon FSx for Lustre: A fully managed Lustre file system that is optimized for compute-intensive workloads.
- Amazon FSx for NetApp ONTAP: A fully managed NetApp ONTAP file system that is accessible from Windows and Linux instances.
- Amazon FSx for OpenZFS: A fully managed OpenZFS file system that is accessible from Windows and Linux instances.
In this article, we will learn how to mount an Amazon FSx for Lustre filesystem on an Amazon EC2 instance.
What is Amazon FSx for Lustre?
Amazon FSx for Lustre is a fully managed file system that is optimized for compute-intensive workloads, such as high-performance computing (HPC), machine learning, and media data processing workflows.
FSx for Lustre is built on the Lustre file system, an open-source, parallel distributed file system that is designed for high-performance computing environments.
FSx mount on EC2 - How it works?
The below architecture diagram shows how Amazon FSx for Lustre can be mounted on an Amazon EC2 instance:

- The VM(s) that will mount the FSx for Lustre filesystem are typically in their own subnets and security groups. In the example above, a webserver is connected to internet using port 80 or 443 and kept in a publicly accessible subnet.
- The EFS drive could should ideally be kept in a separate subnet and security group.
- The two security groups DMZ SG (which contains the EC2 instance) and the NFS SG (which contains the EFS drive) are connected to allow traffic between them over port 2049
Project Lab Setup
Objectives
**In this tutorial, we will **
- Create an EC2 instance
- Create an FSx for Lustre drive
- Mount the FSx drive on the EC2 instance
- Download a image file onto the FSx Lustre mount
- Access the images from another EC2 instance
Prerequisites
You need an AWS Account and AWS CLI installed on your system. You can find the instructions on how to install AWS CLI here.
How to Mount Amazon FSx Lustre filesystem on EC2 instance
We will mount the FSx for Lustre filesystem on Amazon EC2 instance using two methods:
Mount Amazon FSx for Lustre to EC2 using AWS Management Console
Step 1: Create the security groups
We need to create two security groups:
- DMZ SG: This security group will be attached to the EC2 instance and will allow inbound traffic on port 80 and 443.
- FSX SG: This security group will be attached to the FSx for Lustre filesystem
A) Logon to AWS Management Console:
- Search for Security Groups in the search bar and click on it.
- Click on Create security group on the top right.
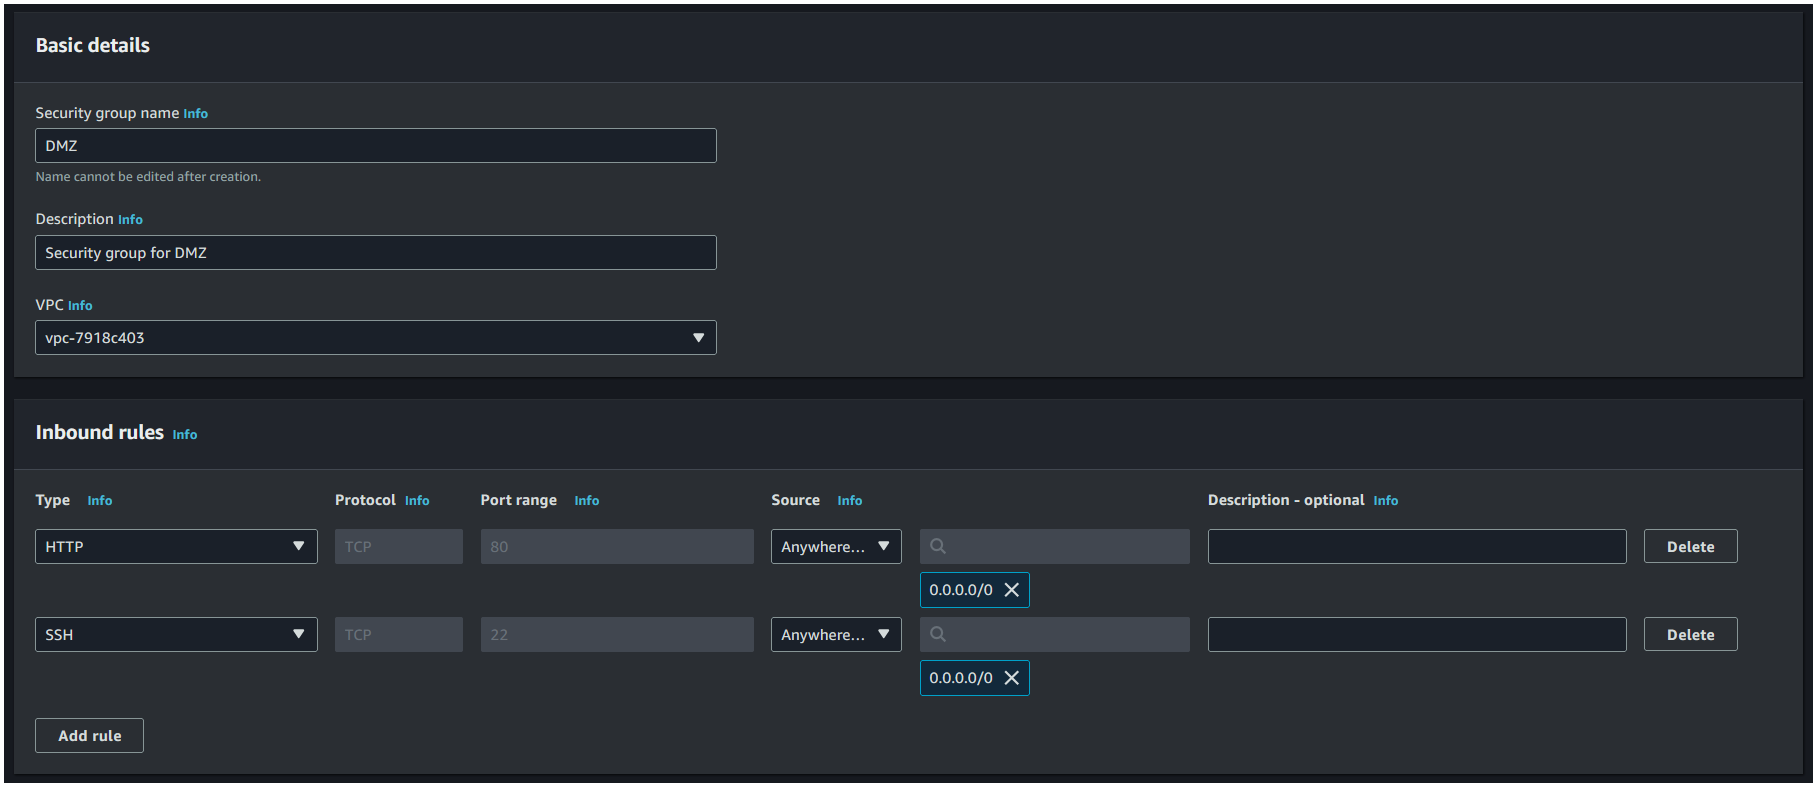
B) In the Create security group page:
- Enter
DMZas the name,Security group for DMZas the description. - In the Inbound rules section, click on Add rule.
- Under Type, select
HTTPand under Source selectAnywhere-IPv4. - Click on Add rule again, and under type search for
SSHand under Source selectAnywhere-IPv4. - Then scroll to the bottom and click on Create security group.
C) Next, go back to the Security Groups page and click on Create security group again. In the Create security group page:
For the FSX security, we need to create a rule that allows traffic on port 998, 1018-1023 within the security group. This will require us to first create the security group and then edit the inbound rules.
- Enter
FSXas the name,Security group for FSXas the description. - Don’t add any inbound rule yet, scroll down to the bottom and click on Create security group.
- From the list of security groups, click on the
FSXsecurity group we just created. - Click on the Edit inbound rules button.
- Click on Add rule. We need 2 rules:
| Type | Protocol | Port range | Source | Security group |
|---|---|---|---|---|
| All TCP | TCP | 0 - 65535 | Custom | FSX |
| All TCP | TCP | 0 - 65535 | Custom | DMZ |
- Click on Save rules.

Step 2: Create the FSx for Lustre filesystem
Logon to AWS Management Console and search for FSx in the search bar and click on it. Then click on Create file system. In the Create file system page, select Amazon FSx for Lustre and click on Next.
Now, in the Specify file system details page:
- Enter a name for the file system.
- Under Deployment and storage type, select
Persistent, SSD. - Under Throughput per unit of storage, select
125 MB/s/TiB. - Under Storage capacity, enter
1.2TiB. - Under Metadata Configuration, select
Automatic. - Under Data compression type, select
NONE.
Next, in the Network & security section:
- Select the VPC where you want to create the FSx for Lustre filesystem.
- Under VPC security group, select the
FSXsecurity group we created earlier. - Under Subnet, select the subnet where you want to create the FSx for Lustre filesystem, in this case, I selected
us-east-1a.
Leave the rest of the settings as default and click on Next. Then click on Create file system.
Step 3: Create the EC2 instance
Search for EC2, and click on EC2 to go to the EC2 page. In the left hand navigation panel, click on Instances. On the top right, click on Launch instances.
In the Launch an instance page:
- In Name and tags section, enter a name for the instance. I chose
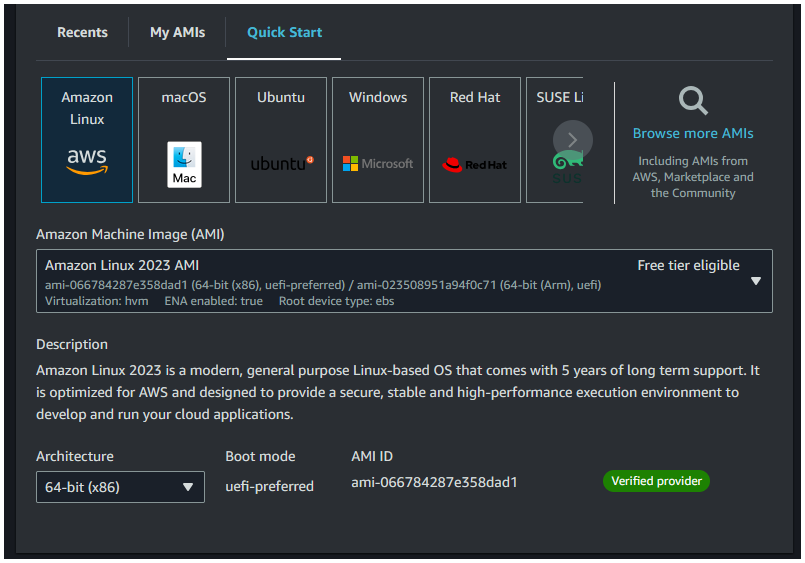
myServer2. - In Application and OS Images section, click on quick start and select
Amazon Linux. Make sure you have choseAmazon Linux 2023 AMIin the Amazon Machine Image (AMI) dropdown. - In Instance type section, select
t2.micro. - In Key pair section, select an existing key pair or create a new one.
- In Network settings, click on Edit button, and change the subnet to the same subnet where the FSx for Lustre filesystem is created. E.g. in my case it was
us-east-1a. - In Firewall (security groups), click on Select exiting security group and select the
DMZsecurity group we created earlier. - Leave the Configure storage section unchanged.
- Click on Launch instance to launch the instance.
Step 4: Mount the FSx for Lustre filesystem on the EC2 instance
Once the EC2 instance is running, connect to the instance by going to the EC2 console and click on Instances. Click on the instance you created in the previous step, then on top right, click on Connect.
A) Update the instance:
sudo yum update -yB) Install the Lustre client:
sudo dnf install -y lustre-clientC) Create a directory to mount the FSx for Lustre filesystem:
sudo mkdir -p /mnt/fsxD) Mount the FSx for Lustre filesystem:
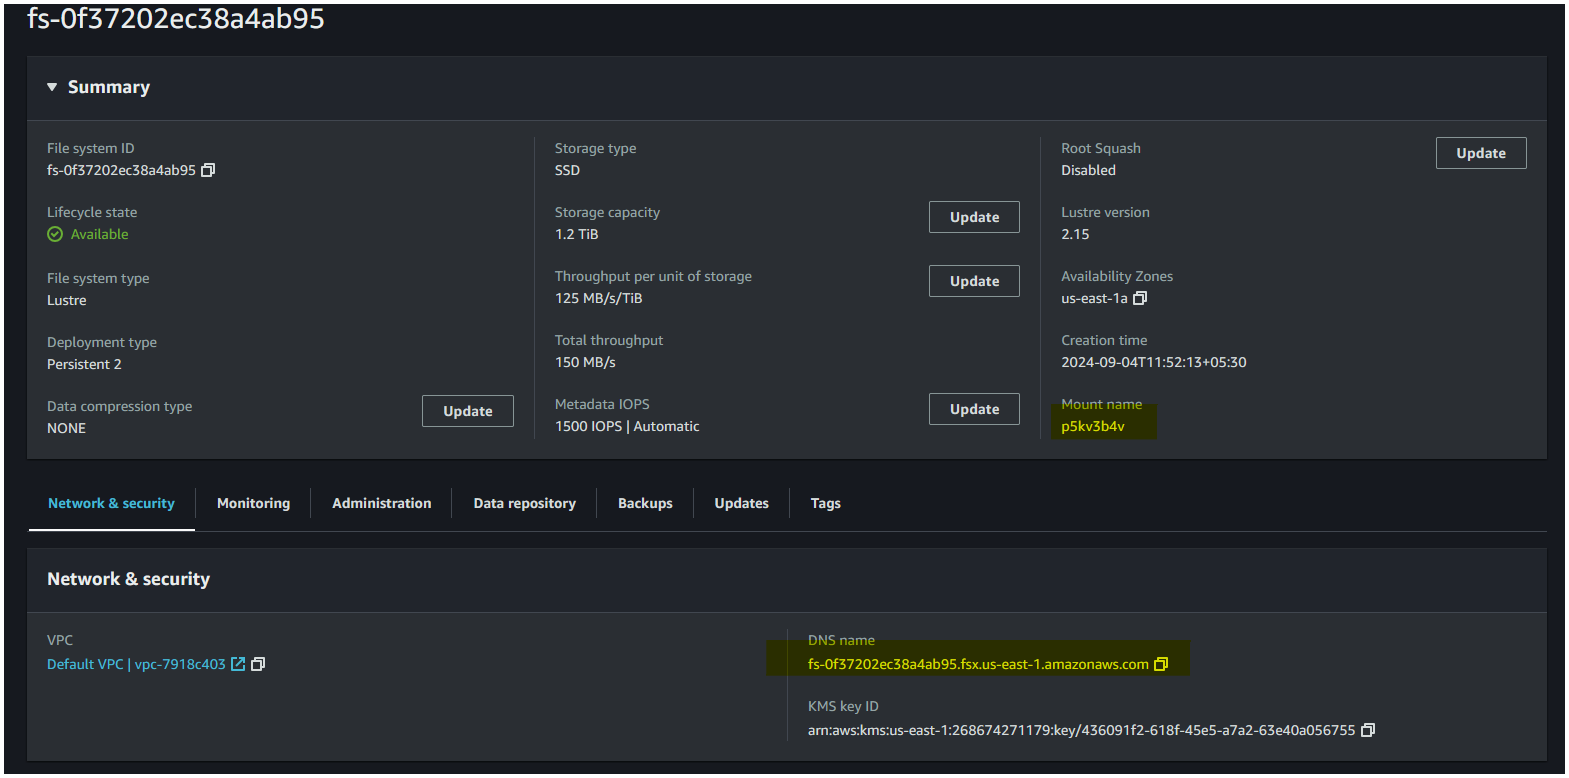
sudo mount -t lustre -o relatime,flock <fsx-dns-name>@tcp:/<mount-name> /mnt/fsxReplace the <fsx-dns-name> with the DNS name, and <mount-name> with the Mount name of the FSx for Lustre filesystem.
You can find both in the FSx console, as shown below:
AWS documentation doesn’t clarify this correctly but the <mount-name> is specific to the instance of FSx Lustre and needs to be specified correctly.
This should mount the FSx for Lustre filesystem on the EC2 instance. You can now access the filesystem by going to the /mnt/fsx directory.
Verify the mount by running the df -h command:
df -h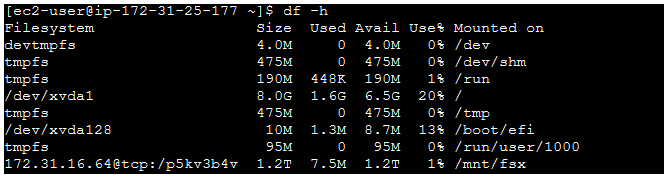
Step 5: Test the FSx for Lustre filesystem
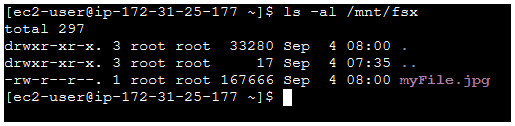
A) Let’s donwload a few files and save them on the FSx for Lustre filesystem:
sudo curl -X GET https://cataas.com/cat -o /mnt/fsx/myFile.jpg && ls -al /mnt/fsx
B) Now, let’s create another EC2 instance and mount the FSx for Lustre filesystem on it:
- Follow step 3 to create an EC2 instance named myServer3.
- Follow step 4 to mount the FSx for Lustre filesystem on the EC2 instance.
C) Now run ls -al /mnt/fsx on the new EC2 instance to see the files downloaded on the FSx for Lustre filesystem.
Mount Amazon FSx for Lustre to EC2 using AWS CLI
Step 1: Create the security groups
A) We need to create two security groups:
- DMZ SG: This security group will be attached to the EC2 instance and will allow inbound traffic on port 80 and 443.
- FSX SG: This security group will be attached to the FSx for Lustre filesystem. This will contain two inbound rules, one to allow traffic from the DMZ SG and another to allow traffic within the FSX SG.
DMZ_SG_ID=$(aws ec2 create-security-group --group-name "DMZ" \
  --description "Security group for DMZ" --query "GroupId" --output text) && \
  FSX_SG_ID=$(aws ec2 create-security-group --group-name "FSX" \
  --description "Security group for FSX" --query "GroupId" --output text) && \
  echo "Created security groups: DMZ: $DMZ_SG_ID and NFS: $FSX_SG_ID"
B) Open the inbound rules for the DMZ security group:
aws ec2 authorize-security-group-ingress --group-id $DMZ_SG_ID \
    --protocol tcp --port 80 --cidr 0.0.0.0/0 && \
    aws ec2 authorize-security-group-ingress --group-id $DMZ_SG_ID \
    --protocol tcp --port 22 --cidr 0.0.0.0/0
C) Create the inbound rules for the FSX security group:
aws ec2 authorize-security-group-ingress --group-id $FSX_SG_ID \
    --protocol tcp --port 0-65535 --source-group $FSX_SG_ID && \
    aws ec2 authorize-security-group-ingress --group-id $FSX_SG_ID \
    --protocol tcp --port 0-65535 --source-group $DMZ_SG_ID
D) Get the default subnet ID from us-east-1a availability zone:
SUBNET_ID=$(aws ec2 describe-subnets --query "Subnets[?AvailabilityZone=='us-east-1a'].SubnetId" --output text)Step 2: Create the FSx for Lustre filesystem
FSX_ID=$(aws fsx create-file-system \
    --file-system-type LUSTRE \
    --storage-capacity 1200 \
    --storage-type SSD \
    --lustre-configuration DeploymentType="PERSISTENT_2",PerUnitStorageThroughput=125 \
    --subnet-id $SUBNET_ID \
    --security-group-ids $FSX_SG_ID \
    --output text \
    --query "FileSystem.FileSystemId") && \
  echo "Created FSx for Lustre filesystem: $FSX_ID"
Step 3: Create the EC2 instance
First, we need to get the latest Amazon Linux 2023 AMI ID. You can go the the AWS Console, go to EC2 -> Instances -> Launch instances. In the Application and OS Images section, select Amazon Linux 2023 AMI. Note the AMI ID at the bottom.
Alternatively, you can use the below command to get the latest Amazon Linux 2023 AMI ID:
A) Create the first EC2 instane named myServer2 in us-east-1a, and store the IP address in a variable.
Repalce <key-pair> with your key pair name and <ami-id> with the Amazon Linux 2023 AMI ID.
MYSERVER1_ID=$(aws ec2 run-instances \
    --image-id <ami-id> \
    --count 1 \
    --instance-type t2.micro \
    --key-name <key-pair> \
    --security-group-ids $DMZ_SG_ID \
    --subnet-id $SUBNET_ID \
    --associate-public-ip-address \
    --tag-specifications "ResourceType=instance,Tags=[{Key=Name,Value=myServer1}]" \
    --query "Instances[0].InstanceId" --output text) && \
    echo "Created EC2 instance myServer1: $MYSERVER1_ID"
B) Get the IP address from the instance metadata:
MYSERVER1_IP=$(aws ec2 describe-instances \
    --instance-ids $MYSERVER1_ID \
    --query "Reservations[0].Instances[0].PublicIpAddress" --output text) && \
    echo "EC2 instance myServer1 IP: $MYSERVER1_IP"
C) Check if the instance state is running and status checks are complete:
aws ec2 wait instance-status-ok --instance-ids $MYSERVER1_IDStep 4: Mount the FSx for Lustre filesystem on the EC2 instance (CLI)
A) Connect to the EC2 instance:
Make sure you replace <key-pair> with your key pair name and that you have downloaded the key pair file.
ssh -i <key-pair>.pem ec2-user@$MYSERVER1_IPB) Install the Lustre client:
sudo dnf install -y lustre-clientC) Create a directory to mount the FSx for Lustre filesystem:
sudo mkdir -p /mnt/fsxD) Mount the FSx for Lustre filesystem:
sudo mount -t lustre -o relatime,flock <fsx-dns-name>@tcp:/<mount-name> /mnt/fsxReplace the <fsx-dns-name> with the DNS name, and <mount-name> with the Mount name of the FSx for Lustre filesystem.
You can find both in the FSx console, as shown below:
To get these values, you can use the below command on a different terminal:
FSX_DNS_NAME=$(aws fsx describe-file-systems --file-system-ids $FSX_ID --query "FileSystems[0].DNSName" --output text) && \
  FSX_MOUNT_NAME=$(aws fsx describe-file-systems --file-system-ids $FSX_ID --query "FileSystems[0].LustreConfiguration.MountName" --output text) && \
  echo "FSx DNS name: $FSX_DNS_NAME, Mount name: $FSX_MOUNT_NAME"
Verify the mount by running the df -h command.
Step 5: Test the FSx for Lustre filesystem
A) Let’s donwload a few files and save them on the FSx for Lustre filesystem:
On the EC2 instance, run the below command:
sudo curl -X GET https://cataas.com/cat -o /mnt/fsx/myFile.jpg && ls -al /mnt/fsxLogout from the EC2 instance by running exit.
B) Create another EC2 instance named myServer3 and mount the FSx for Lustre filesystem on it:
MYSERVER2_ID=$(aws ec2 run-instances \
    --image-id <ami-id> \
    --count 1 \
    --instance-type t2.micro \
    --key-name <key-pair> \
    --security-group-ids $DMZ_SG_ID \
    --subnet-id $SUBNET_ID \
    --associate-public-ip-address \
    --tag-specifications "ResourceType=instance,Tags=[{Key=Name,Value=myServer1}]" \
    --query "Instances[0].InstanceId" --output text) && \
    echo "Created EC2 instance myServer1: $MYSERVER2_ID"
C) Get the IP address from the instance metadata:
MYSERVER2_IP=$(aws ec2 describe-instances \
    --instance-ids $MYSERVER2_ID \
    --query "Reservations[0].Instances[0].PublicIpAddress" --output text) && \
    echo "EC2 instance myServer1 IP: $MYSERVER2_IP"
D) Check if the instance state is running and status checks are complete:
aws ec2 wait instance-status-ok --instance-ids $MYSERVER2_IDE) Follow the mount instructions in step 4 to mount the FSx for Lustre filesystem on the new EC2 instance.
F) Run ls -al /mnt/fsx on the new EC2 instance to see the files downloaded on the FSx for Lustre filesystem.
Log out from the EC2 instance by running exit.
Step 6: Clean up
Clean up the resources by:
A) Deleting the EC2 instances and waiting for the instances to terminate:
aws ec2 terminate-instances --instance-ids $MYSERVER1_ID $MYSERVER2_ID && \
  aws ec2 wait instance-terminated --instance-ids $MYSERVER1_ID $MYSERVER2_ID
B) Delete the FSx for Lustre filesystem:
aws fsx delete-file-system --file-system-id $FSX_ID &&There is no
waitcommand for FSx deletion. Hence you have to run the below command to check the status and wait till the deletion is complete.
Wait for the FSx for Lustre filesystem to be deleted. Check the status by running:
aws fsx describe-file-systems --file-system-ids $FSX_IDC) Deleting the security groups:
aws ec2 delete-security-group --group-id $FSX_SG_ID && \
  aws ec2 delete-security-group --group-id $DMZ_SG_ID
Need help?
Start a discussion on GitHub if you’ve got questions or improvements. Open discussions →