Mount Amazon EFS Drive on EC2 Ubuntu Linux using NFS Utils
A comprehensive guide to mount Amazon Elastic File Storage (EFS) on Ubuntu Linux using NFS Utils and then use it to serve files from the EFS drive. The guided includes instructions for both AWS Console & CLI
On this page
The first question that you should be asking yourself is, why not use amazon-efs-utils to mount the EFS drive?
In short, amazon-efs-utils package is only available for Amazon Linux and other Linux versions require you to build it from scratch. Also the fact that EFS is supposed to act like a Network File System (NFS) and that almost all Linux versions have an already available & extensively tested NFS Utilities.
Even though EFS mount helper is comparatively easier to use, NFS is still preferred by most enterprises because they want to use proven and throughly tested utilities especially if they impact important services.
What is Amazon EFS?
Amazon Elastic File Storage (EFS) is a network mountable elastic shared drive. Which means, you can attach/mount it to your Linux machine as a network drive and it starts with a capacity of almost 0 and can easily grow into Petabytes of storage.
EFS mount on EC2 - How it works?
The below architecture diagram explains a typical use case of how EFS is used with EC2.
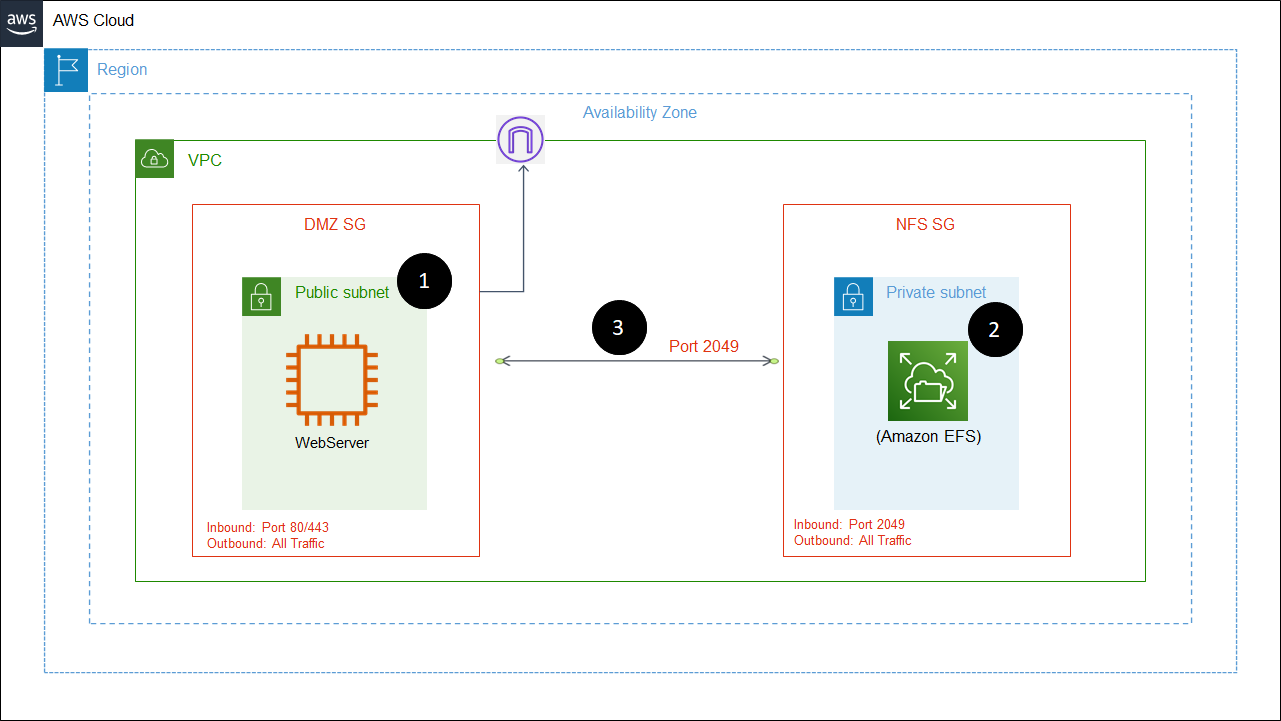
- The VM(s) that will mount the drive are typically in their own subnets and security groups. In the example above, a webserver is connected to internet using port 80 or 443 and kept in a publicly accessible subnet.
- The EFS drive could should ideally be kept in a separate subnet and security group.
- The two security groups DMZ SG (which contains the EC2 instance) and the NFS SG (which contains the EFS drive) are connected to allow traffic between them over port 2049
Project Lab Setup
Objectives
**In this tutorial, we will **
- Create an EC2 webserver with Apache installed
- Create an EFS drive
- Mount the EFS drive on the EC2 webserver
- Download a image file onto the EFS drive
- Create a basic HTML page that will display image
Prerequisites
You need an AWS Account and AWS CLI installed on your system. You can find the instructions on how to install AWS CLI here.
How to Mount an Amazon EFS to EC2?
We will mount the EFS drive on EC2 using two methods:
Mount Amazon EFS to EC2 Ubuntu Linux using AWS Console
Step 1) Create the security groups
We need to create two security groups as follows:
- DMZ SG - This SG is used to allow traffic from the internet to the EC2 instance, i.e. port 80 or 443.
- NFS SG - This SG is used to allow traffic from the members of the DMZ SG to the EFS drive over port 2049.
A) Logon to AWS Management Console:
- Search for Security Groups and click on Security Group under features.
- Click on Create security group on the top right.
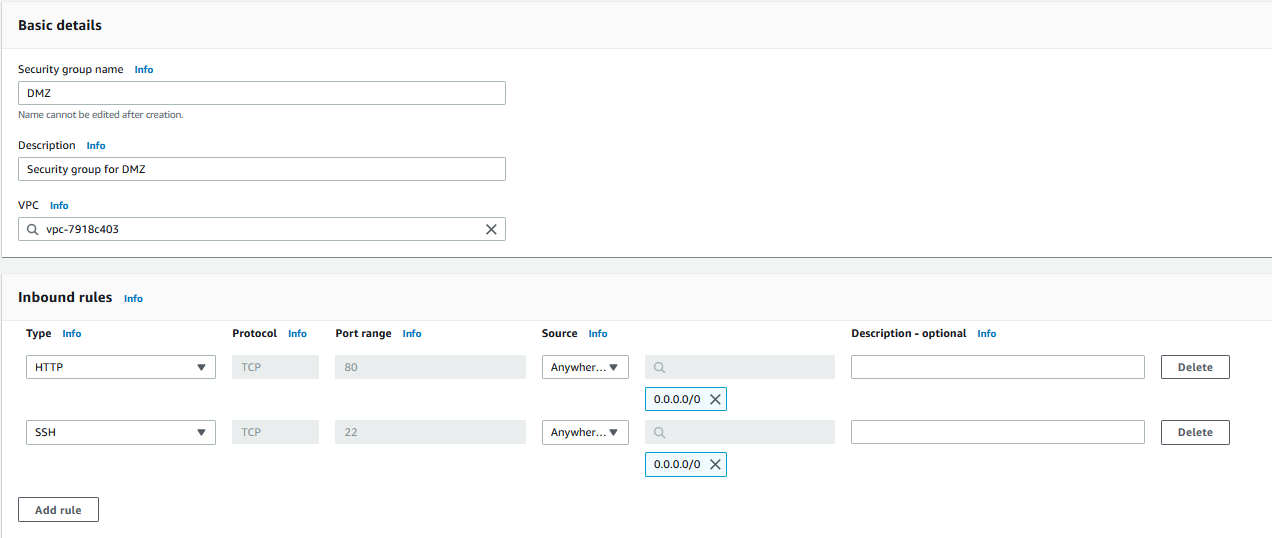
B) In the Create Security Group dialog:
- Enter
DMZas the name,Security group for DMZas the description. - In the inbound rules section, click on Add Rule,
- Under Type select
httpand under Source selectAnywhere-IPv4. - CLick on Add Rule again, and under type search for
SSHand under Source selectAnywhere-IPv4. - Then scroll to bottom and click on Create security group.
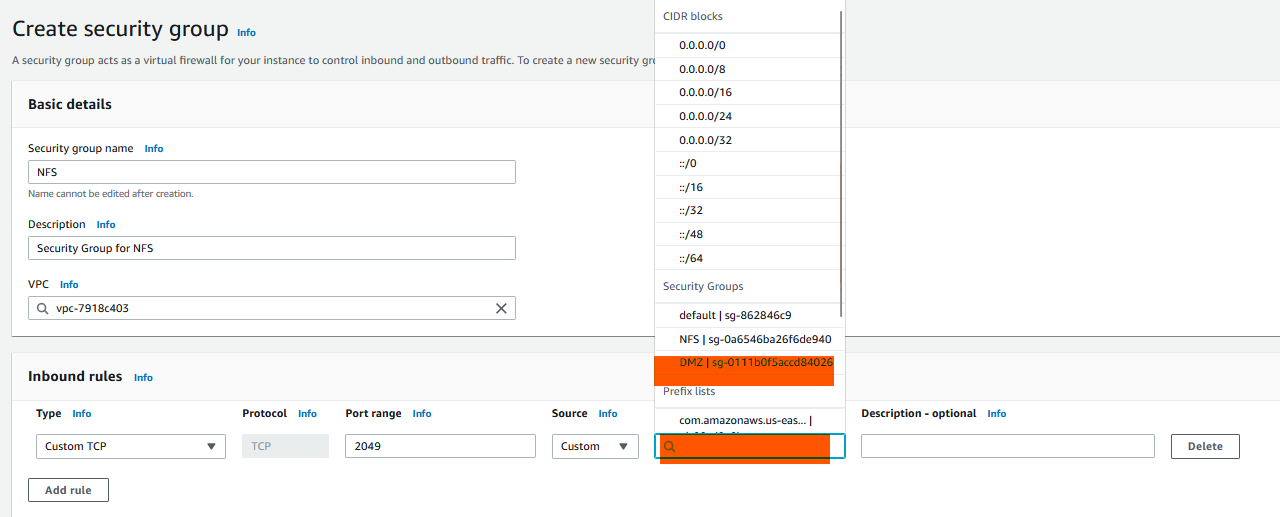
C) Next, Go back to Security Groups page and click on Create security group again. In the Create Security Group dialog:
- Enter
NFSas the name,Security group for NFSas the description. - In the inbound rules section, under Type select
NFSand under Source click on the textbox to bring up a list of CIDR & Security Group options. - Select
DMZ|sg-xxxxxxx, i.e. the security group we created earlier, under security groups. Then scroll to bottom and click on Create security group.
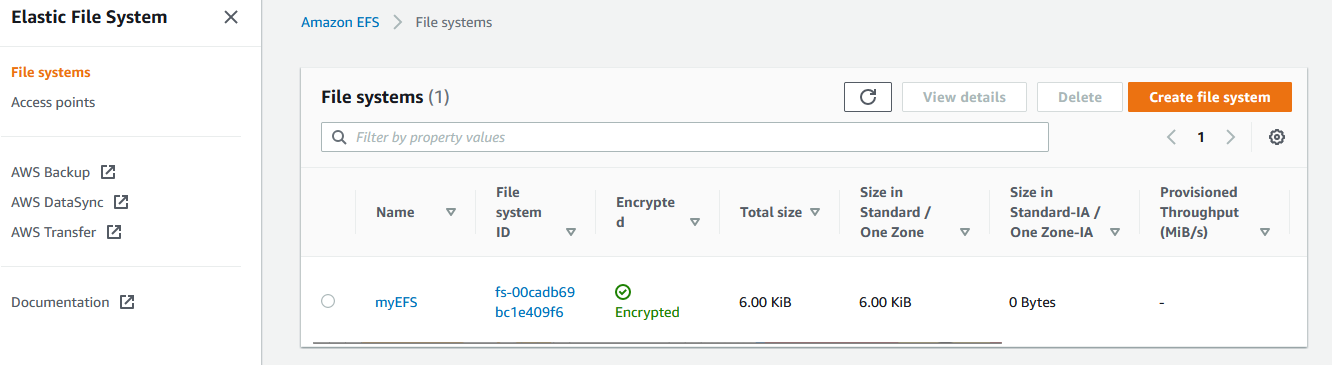
Step 2) Create the EFS Drive
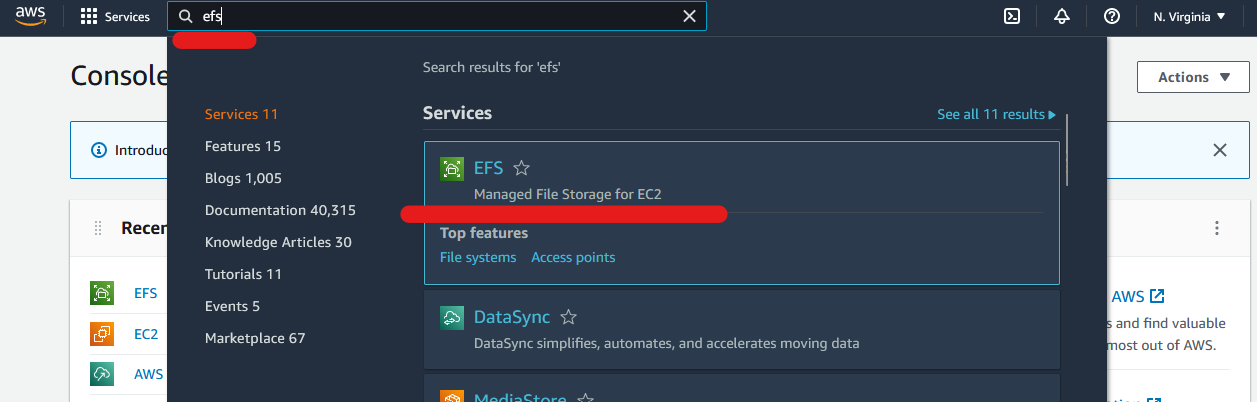
Log on to AWS Console, search for EFS and then click on EFS.
Click on “Create file system”, in the Create File System dialog:
- Choose a name for your file system, I chose myEFS.
- Under Availability and durability section, choose One Zone
- Under Availability Zone choose
us-east-1aand then click on Create button
Now you should see a File system created named myEFS under File systems section.
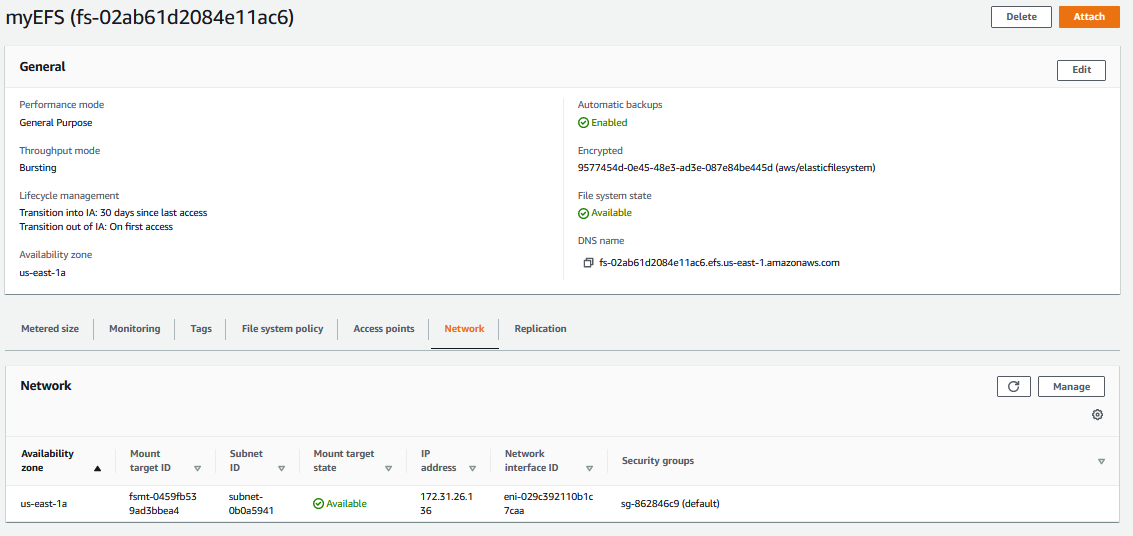
Step 3) Customise EFS & Configure Security Groups
Because we used the quick create option and didn’t customize our EFS file system, it was created with several default settings such as:
- Automatic backups: Enabled
- Lifecycle management: EFS Intelligent tiering is enabled, and configured to transition files from Standard to Standard-Infrequent Access tier after 30 days of inactivity and to transition out on first access.
- Performance mode: Only General Purpose is available for One ZOne.
- Throughput mode: Bursting is selected by default. The alternative is Provisioned.
- Encryption: Enabled
- Network access: Default VPC, default subnet, and default security group associated with the Availability Zone is selected
While 1 - 5 are file, we need to modify the Network access to enable the EFS to communicate with the EC2 instance on port 2049.
A) In the left hand panel,
- Click on File systems, then under File system, click on myEFS.
- At the bottom, select the Network tab.
- Then click on Manage button after Mount target state becomes Available.
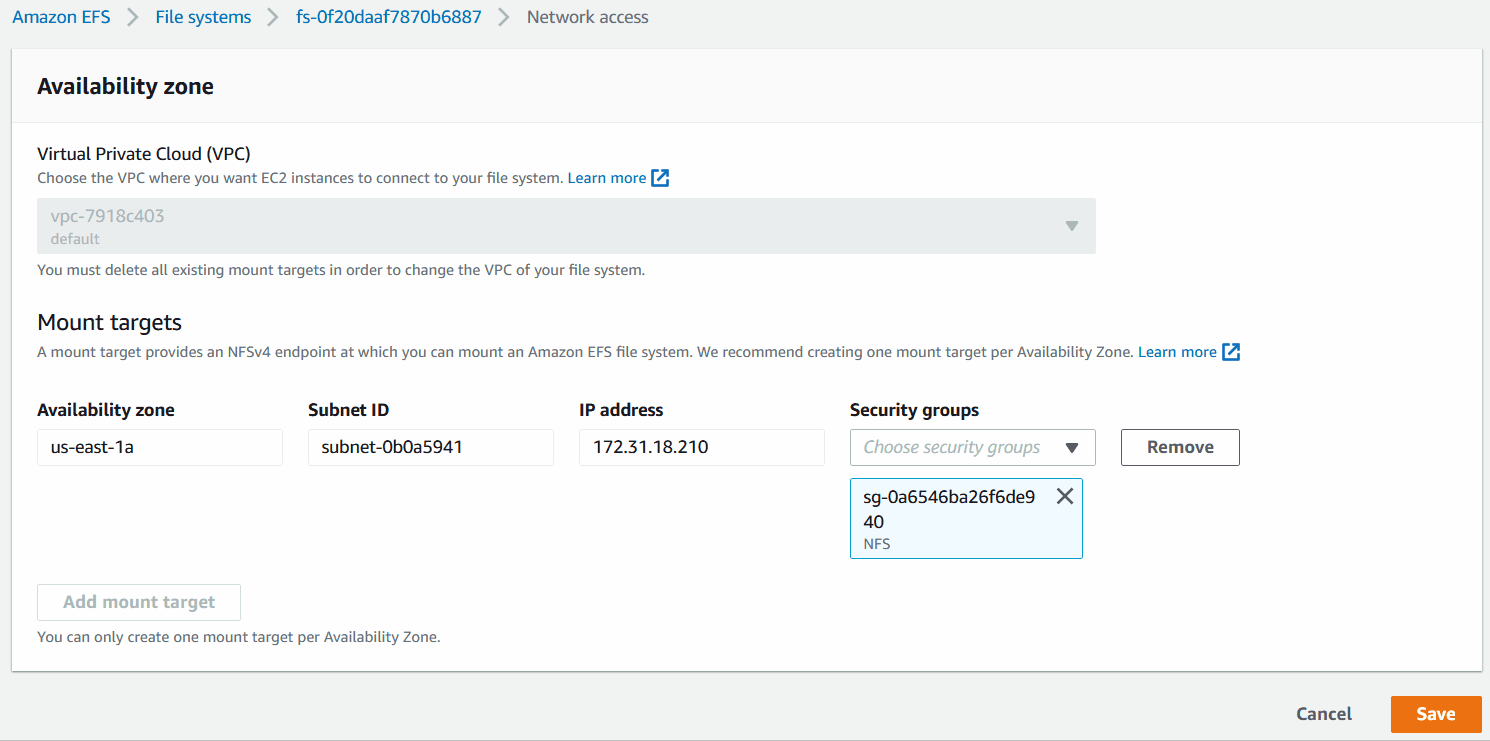
B) In the Network access page, under Mount targets,
- Remove the existing default Security Group
- Click on the dropdown under Security Groups and select
NFS|sg-xxxxxxx - Then save the changes
Step 4) Create the EC2 Ubuntu Linux instance
Search for EC2, and click on EC2 to go to the EC2 page. In the left hand navigation panel, click on Instances.
Now on top right, click on Launch instances, then
- Name and tags section, provide a name. I Chose
myServer1 - Application and OS Images section, select Ubuntu, then from the dropdown, select Ubuntu 20.04.
- Instance type section, select t2.micro.
- Key pair section, select any keypair, or create one if you don’t have one.
- Network setting, click on Edit button, then change the subnet to the one in
us-east-1. Then click on Select existing security group and from dropdown, selectDMZ|sg-xxxxxxx - Configure storage, leave unchanged
- Then click on Launch instance button.
Step 5) Login to the EC2 instance
Go to the EC2 console and click on Instances. Click on the instance you created in the previous step, then on top right, click on Connect.
In Connect to instance dialog, click on EC2 Instance Connect and then at the bottom right, click on Connect.
Install NFS Utilities and enable it to start on startup.
sudo apt install nfs-common -y && \
    sudo systemctl status nfs-utils
Step 6) Mount the EFS Drive
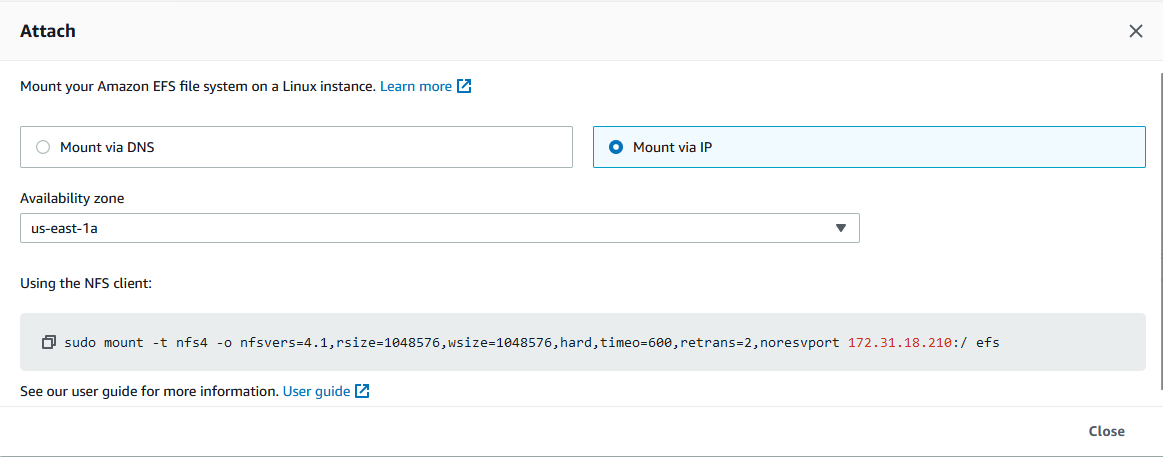
Go to the EFS, click on the EFS file system you created, e.g. myEFS. At the bottom, click on network and note the IP address.
Next, mount the EFS drive to the EC2 instance. Replace <EFS IP> with the IP address from above.
mkdir efs
sudo mount -t nfs4 -o nfsvers=4.1,rsize=1048576,wsize=1048576,hard,timeo=600,retrans=2,noresvport <EFS IP>:/ efs
Alternatively, then click on Attach*. In the subsequent dialog, select on Mount via IP. Copy the command provided and run it in the EC2 Ubuntu terminal from previous step.
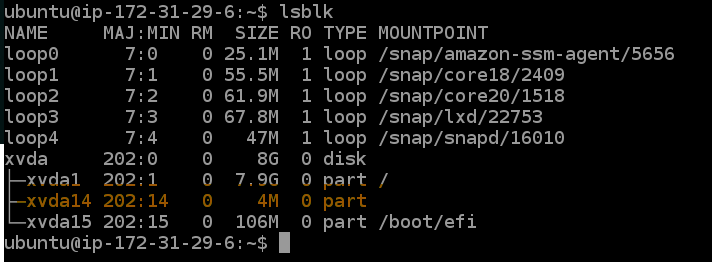
Next, run the below command in the EC2 terminal.
lsblkYou should now see the EFS drive mounted as a new partition.
Step 7) Test the mounted EFS Drive
A) Now let’s download a few files and save them in the directory.
sudo curl -X GET https://cataas.com/cat -o efs/myFile.jpgB) List the files
ls -al efs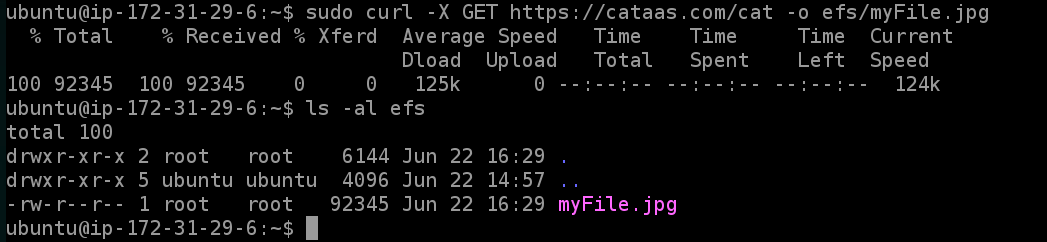
C) Now follow steps 4, 5 and 6 again to create another EC2 instance.
- Follow step 4 to create another EC2 instance named
myServer2 - Follow step 5 lo login to the server
- Follow step 6 to mount the EFS drive on the new server
D) Now run ls -al efs to check the contents of the mounted directory. This should be the same as that of myServer1 above.

Mount Amazon EFS to EC2 Ubuntu Linux using AWS CLI
Step 1: Create Security Groups
A) We need to create two security groups as follows:
- DMZ SG - This SG is used to allow traffic from the internet to the EC2 instance, i.e. port 80 or 443.
- NFS SG - This SG is used to allow traffic from the members of the DMZ SG to the EFS drive over port 2049.
DMZ_SG_ID=$(aws ec2 create-security-group --group-name "DMZ" \
  --description "Security group for DMZ" --query "GroupId" --output text) && \
  NFS_SG_ID=$(aws ec2 create-security-group --group-name "NFS" \
  --description "Security group for NFS" --query "GroupId" --output text) && \
  echo "Created security groups: DMZ: $DMZ_SG_ID and NFS: $NFS_SG_ID"
This will create the security groups and assign the IDs to the variables.
B) Next open port 80 & 22 access from anywhere (CIDR 0.0.0.0/0) for DMZ security group
aws ec2 authorize-security-group-ingress --group-id $DMZ_SG_ID \
    --protocol tcp --port 80 --cidr 0.0.0.0/0 && \
    aws ec2 authorize-security-group-ingress --group-id $DMZ_SG_ID \
    --protocol tcp --port 22 --cidr 0.0.0.0/0
Next allow access from DMZ SG to NFS SG over port 2049.
aws ec2 authorize-security-group-ingress --group-id $NFS_SG_ID \
    --source-group $DMZ_SG_ID --protocol tcp --port 2049
Step 2: Create EFS File System
A) Create a new EFS file system named myEFS in us-east-1a.
EFS_ID=$(aws efs create-file-system \
    --availability-zone-name "us-east-1a" \
    --encrypted \
    --tags "Key=Name,Value=myEFS" \
    --query "FileSystemId" --output text) && \
    echo "Created EFS file system: $EFS_ID"
B) By default, AWS CLI doesn’t create a Mount target, assign Security group, configure Subnet, or configure Lifecycle management. while we don’t need to configure the latter, we do need to create a Mount target.
Creating Mount target also requires assigning a Security group and choosing the Subnet where the Mount target will be created. We know the Security group and its ID already, but we need to find the ID of the default Subnet for the us-east-1a availability zone.
SUBNET_ID=$(aws ec2 describe-subnets \
    --filters "Name=availability-zone,Values=us-east-1a" \
    --query "Subnets[0].SubnetId" --output text) && \
    echo "Subnet ID for us-east-1a: $SUBNET_ID"
C) Now create the Mount target.
aws efs create-mount-target --file-system-id $EFS_ID \
    --subnet-id $SUBNET_ID --security-groups $NFS_SG_ID
This will output the following data, note down the IpAddress.
{
    "OwnerId": "268674271179",
    "MountTargetId": "fsmt-0955bbcc67dccca55",
    "FileSystemId": "fs-051523e63a4561e3d",
    "SubnetId": "subnet-0b0a5941",
    "LifeCycleState": "creating",
    "IpAddress": "172.31.23.189",
    "NetworkInterfaceId": "eni-057847b7e1c9adf1f",
    "AvailabilityZoneId": "use1-az4",
    "AvailabilityZoneName": "us-east-1a",
    "VpcId": "vpc-7918c403"
}
Step 3: Create the EC2 Ubuntu instance
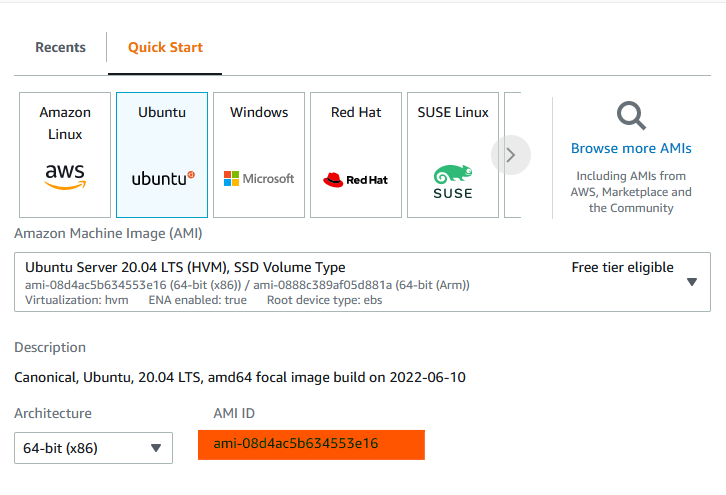
First open the AWS console, go to EC2 -> Instances -> Launch instances. In the Application and OS Images section, select Ubuntu and then from the dropdown select Ubuntu 20.04 LTS (HVM). Note the AMI ID at the bottom.
A) Create a new EC2 instance named myServer1 in us-east-1a. and store the IP address of the instance in a variable.
MYSERVER1_ID=$(aws ec2 run-instances \
    --image-id ami-08d4ac5b634553e16 \
    --count 1 \
    --instance-type t2.micro \
    --key-name myKeyPair \
    --security-group-ids $DMZ_SG_ID \
    --subnet-id $SUBNET_ID \
    --associate-public-ip-address \
    --tag-specifications "ResourceType=instance,Tags=[{Key=Name,Value=myServer1}]" \
    --query "Instances[0].InstanceId" --output text) && \
    echo "Created EC2 instance myServer1: $MYSERVER1_ID"
B) Get the IP address from instance metadata.
MYSERVER1_IP=$(aws ec2 describe-instances \
    --instance-ids $MYSERVER1_ID \
    --query "Reservations[0].Instances[0].PublicIpAddress" --output text) && \
    echo "EC2 instance myServer1 IP: $MYSERVER1_IP"
C) Check if the instance state is running and status checks are complete.
aws ec2 wait instance-status-ok --instance-ids $MYSERVER1_IDStep 4: Login to the EC2 instance
Make sure you have a keypair downloaded and parth is specified correctly below
ssh -i ~/.ssh/myKeyPair.pem ubuntu@$MYSERVER1_IPIn case you get
SSH Permission are too openerror, change the file’s permission to600by runningchmod 600 ~/.ssh/myKeyPair.pem
Install the NFS Utilities
sudo apt install nfs-common -y && \
    sudo systemctl status nfs-utils
Step 5: Mount the EFS File System
Next, mount the EFS drive to the EC2 instance. Replace
mkdir efs
sudo mount -t nfs4 -o nfsvers=4.1,rsize=1048576,wsize=1048576,hard,timeo=600,retrans=2,noresvport <EFS IP>:/ efs
Run the following command in the EC2 terminal to see the EFS drive mounted.
lsblk
Step 6: Test the mounted EFS Drive
A) Download a file and save them in EFS drive.
sudo curl -X GET https://cataas.com/cat -o efs/myFile.jpgB) List the files
ls -al efs
B) Logout from myServer1
exitC) Now back in your AWS CLI, create a new instance named myServer2 in us-east-1a.
MYSERVER2_ID=$(aws ec2 run-instances \
    --image-id ami-08d4ac5b634553e16 \
    --count 1 \
    --instance-type t2.micro \
    --key-name myKeyPair \
    --security-group-ids $DMZ_SG_ID \
    --subnet-id $SUBNET_ID \
    --associate-public-ip-address \
    --tag-specifications "ResourceType=instance,Tags=[{Key=Name,Value=myServer2}]" \
    --query "Instances[0].InstanceId" --output text) && \
    echo "Created EC2 instance myServer2: $MYSERVER2_ID"
Get the IP address from instance metadata.
MYSERVER2_IP=$(aws ec2 describe-instances \
    --instance-ids $MYSERVER2_ID \
    --query "Reservations[0].Instances[0].PublicIpAddress" --output text) && \
    echo "EC2 instance myServer2 IP: $MYSERVER2_IP"
D) Check if the instance state is running and status checks are complete.
aws ec2 wait instance-status-ok --instance-ids $MYSERVER2_IDE) After the above command wait is complete, login to the EC2 instance myServer2
ssh -i ~/.ssh/myKeyPair.pem ubuntu@$MYSERVER2_IPF) Follow the mount instructions in Step 5 above to mount the EFS drive.
Finally, run ls -al efs to see the files in the EFS drive that was downloaded from myServer1.
Logout from EC2 instance myServer2 before proceeding to next step by running exit
Step 7: Clean up
Clean up the EC2 instances and wait for them to terminate.
aws ec2 terminate-instances --instance-ids $MYSERVER1_ID $MYSERVER2_ID && \
  aws ec2 wait instance-terminated --instance-ids $MYSERVER1_ID $MYSERVER2_ID
Next, we need to delete the Mount target. First, fetch ID of the Mount target. You can also manually get this from the output in step 2C.
MOUNT_TARGET_ID=$(aws efs describe-mount-targets \
    --file-system-id $EFS_ID \
    --query "MountTargets[0].MountTargetId" --output text) && \
    echo "EFS Mount Target ID: $MOUNT_TARGET_ID"
Then, delete the Mount target.
aws efs delete-mount-target --mount-target-id $MOUNT_TARGET_IDFinally, delete the EFS file system.
aws efs delete-file-system --file-system-id $EFS_IDNeed help?
Start a discussion on GitHub if you’ve got questions or improvements. Open discussions →
Related posts
How to create a Lambda function in a Custom Docker image using AWS CDK in Python
Mount Amazon FSX Lustre filesystem and attack to AWS EC2 instance
Get your AWS Account ID using AWS CLI
How to install and configure AWS CLI on Linux with Autocompletion
How to Install and Run WordPress on an EC2 Instance