How to install and configure AWS CLI on Linux with Autocompletion
A guide to how to install and configure AWS CLI on Ubuntu Linux with Autocompletion turned on
On this page
AWS provides several tools to help you manage and automate your AWS environment. Some of the key ones are
- AWS CLI - The command line interface for AWS
- AWS SAM CLI - The command line interface for AWS Serverless Application Model
- AWS CDK - The AWS Cloud Development Kit
- AWS Chalice - The AWS Serverless Development Framework
What is AWS CLI?
AWS CLI (Command Line Interface) is an open source tool hosted on GitHub that allows you to interact with AWS services from the command line shell on Linux, Mac OS, or Windows.
You can use AWS CLI on either bash, zsh, or tcsh shells on Linux/MacOS and PowerShell on Windows. Additionally, AWS CLI is installed by default on all AWS Linux EC2 instances.
AWS CLI can manage all IaaS (Infrastructure as a Service) services that are available in AWS Management Console.
Installing AWS CLI on Ubuntu Linux
Step 1) First, update your Ubuntu Linux system and install unzip and curl packages.
sudo apt update && sudo apt upgrade -y && sudo apt install unzip curl -yStep 2) Then download & unzip AWS CLI.
curl "https://awscli.amazonaws.com/awscli-exe-linux-x86_64.zip" -o "awscliv2.zip" \
   && unzip awscliv2.zip
Step 3) Finally, install AWS CLI.
sudo ./aws/installVerify that you can use the AWS CLI by running the following command:
aws --versionConfiguring AWS CLI for use
AWS CLI relies on “Programmatic Access” credentials to access AWS services.
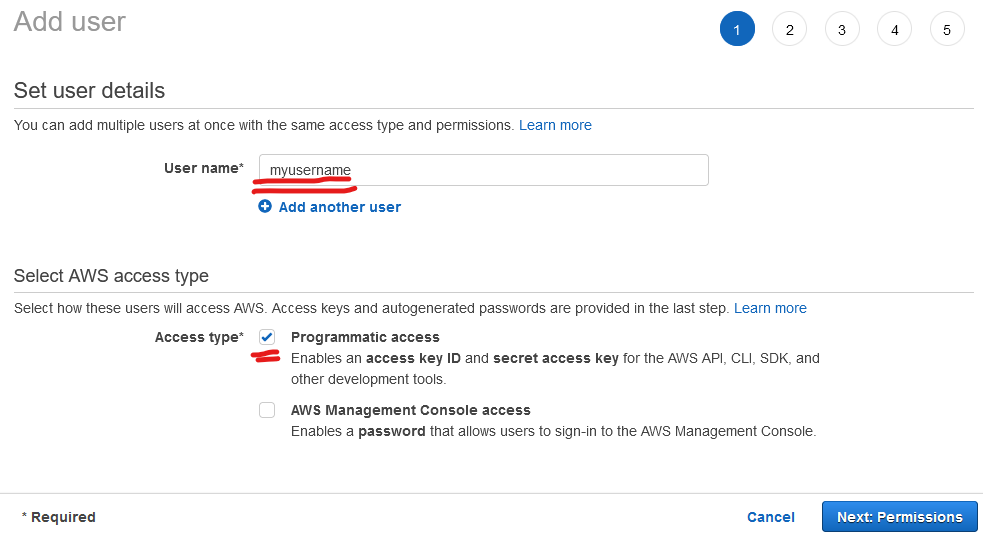
Ideally, you should create an IAM User Account with only programmatic access to use with AWS CLI as shown below.
Create a new IAM User Account with Admin Access
- Login to AWS Management Console and navigate to IAM
- On the left navigation pane, click on Users
- CLick on Add users
- Choose a username & select only Programmatic access under Select AWS access type, then click Next: Permissions
- Then click on Attach existing policies and select AdministratorAccess from the list of available policies. Then click Next: Tags
- You can leave the Tags empty and click Next: Review
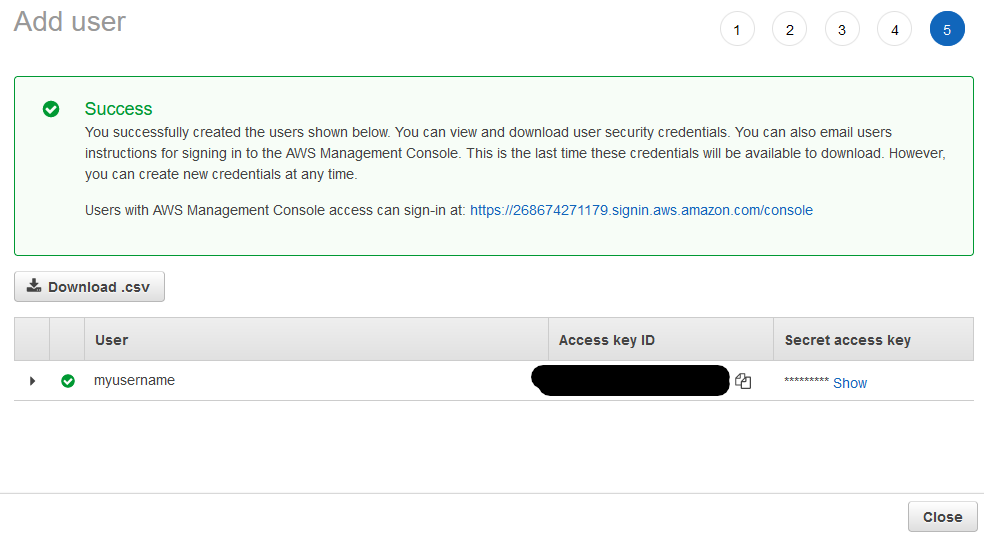
- Click Create user to create your new IAM User Account
Keep this window open for now, and notice the Access key ID & Secret access key. This will be needed in next step.
WARNING: Never store this credentials anywhere or share them with anyone. An attacker can user your credentials to create AWS resources in your account. If you need to reconfigure, you can generate a new credentials from IAM screen.
Configure AWS CLI to use the new IAM User Account
Open a terminal and run the following command:
aws configureThis will start an interactive session, copy paste your access keys and secret access keys that was generated in previous step when prompted
aws configure
AWS Access Key ID [None]: <your access key id>
AWS Secret Access Key [None]: <your secret access key>
Default region name [None]: us-east-1
Default output format [None]: json
Configuring AWS CLI for Autocompletion
AWS CLI relies on a module named aws_completer for autocompletion. This module should be installed while installing AWS CLI however, for it to work correctly it requires
aws_completerto be on thePATH- Enable command completion in the shell
Ensure aws_completer is added to the PATH
First, check if the aws_completer is already on path by running the following command:
which aws_completerThis should result in the following output:

If you get the above output, it means that the aws_completer is already on the PATH. So you can skip to Enable command completion in the shell section.
Otherwise if you don’t see any output, it means that the aws_completer is not on the PATH, follow the steps below to add it to the PATH.
Add aws_completer to the PATH
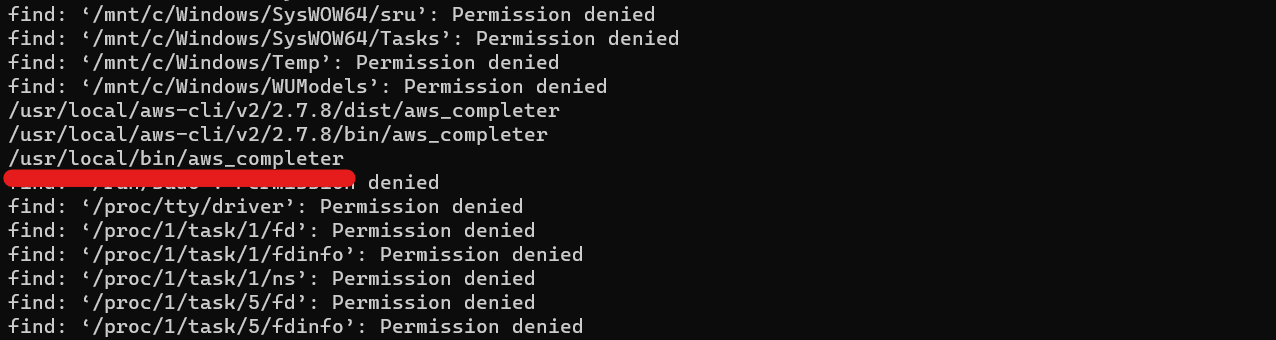
Step 1: Find aws_completer executable file by running the following command:
find / -name aws_completerThis will search for the aws_completer executable file in your filesystem. E.g. if you scroll through the results, you should see something similar to the following output:
Step 2: Identify your shell and add the aws_completer to the PATH.
Run echo $SHELL to see what shell you are using.

If you are using some other shell, you will get a different output.
Step 3: Find the shell configuration file for your shell.
Depending on the shell you’re using, your shell’s profile file will be one of the following:
- Bash:
.bash_profile,.bash_login, or.profile - Zsh:
.zshrc - Tcsh:
.tcshrc,.cshrc, or.login
Find your shell’s profile file by running the following command and look for profile file as per above
ls -a ~/.bash_profile ~/.bash_login ~/.profile ~/.zshrc ~/.tcshrc ~/.cshrc ~/.loginYou will get a bunch of “No such file or directory” errors except for the shell profile file.
E.g. in my case, I am using bash and my profile file is .profile thus running the above command will result in the following output:

Step 4: Add the aws_completer to the PATH
Now open the shell profile using any text editor, e.g. vi or nano and add the following line to the end of the file and replace <path to aws_completer directory> with the path to the aws_completer executable file discovered in step 2:
export PATH=<path to aws_completer directory>:$PATHStep 5: Restart your shell
Depending upon the shell, restart your shell by running the following command by replacing <your profile file> with the name of your shell profile file as per step 4:
source ~/<your profile file>E.g. in my case, this would be source ~/.profile
Enable command completion in the shell
After you have added the aws_completer to the PATH, you need to perform a few steps to enable command completion depending on your shell.
- bash: Open the
.bashrcfile in your home directory and add the following line to the end of the file:
complete -C '<path to aws_completer directory>/aws_completer' awsE.g. in my case, the above would be
complete -C '/usr/local/bin/aws_completer' aws- zsh: Open the
.zshrcfile in your home directory and add the following line to the end of the file:
autoload bashcompinit && bashcompinit
autoload -Uz compinit && compinit
complete -C '<path to aws_completer directory>/aws_completer' aws- tcsh: Open the
.tcshrcfile in your home directory and add the following line to the end of the file:
complete aws 'p/*/`aws_completer`/'Verify that the command completion is working
Reload your shell configuration file, replace <your profile file> with the appropriate shell configure file
source ~/<your shell config file>Then type aws s3 and press TAB to see the list of available commands.
You AWS CLI is configure and autocomplete is working.
Need help?
Start a discussion on GitHub if you’ve got questions or improvements. Open discussions →
Series