How to create an AWS EC2 instance using AWS CLI
A guide to create an EC2 instance using AWS CLI and login to the server
On this page
EC2 (Elastic Cloud Compute) is the original IaaS cloud service launched by Amazon in the mid-2000s which since then has launched the new era of cloud computing.
EC2 allows you to create an manage a virtual machine (VM) in cloud without having to worry about the hardware or virtualisation software.
How to create an EC2 instance?
We will create an EC2 instance in this tutorial using the AWS CLI.
If you’re looking for a tutorial on how to create EC2 instance using the AWS Console, please see below
Create an EC2 instance using AWS CLI
The syntax for creating an EC2 instance using AWS CLI is as follows:
aws ec2 run-instances \
    --image-id <ami-id> \
    --count 1 \
    --instance-type <instance-type> \
    --key-name <keypair-name> \
    --security-groups <security-group-name> \
    --subnet-id <subnet-id> \
    --associate-public-ip-address \
    --tag-specifications 'ResourceType=instance,Tags=[{Key=Name,Value=<name>}]' \
    --block-device-mappings '[{"DeviceName":"/dev/xvda","Ebs":{"VolumeSize":20,"VolumeType":"gp2"}}]'
Hence to create an EC2 instance, we need the following:
- Choose AMI ID: AMI ID of the image we want to use. In this case, we will use
ami-090fa75af13c156b4. You can find this in AWS console while launching an instance manually as shown here - Choose Instance Type: The instance type that we want to use. In this case, we will use
t2.micro - Create Key-Pair: Create a key pair to use, we will name it
my-key-pair - Create Security Group: Create a security group that allows inbound traffic on SSH, HTTP, and HTTPS ports. We will name it
my-web-sg - Choose Subnet: The subnet that we want to use considering the region and availability zone. In this case, we want to use subnet corresponding to
us-east-1a - Associate Public IP: We will allow to associate a public IP address to the instance.
- Tag the instance: We will tag the instance with the name
my-ec2-instance - Configure Storage: We will configure the storage to have 20GB of storage and type
gp2 - Launch the instance: Launch the instance
1. Choose AMI ID
We want to find the details of the AMI ID of Amazon Linux 2 AMI in us-east-1 region. While you can try to look it up using the CLI and describe-images command, it’s way simpler just looking it up in the AWS console. E.g. you can see the AMI ID at the bottom in the below image the AMI ID
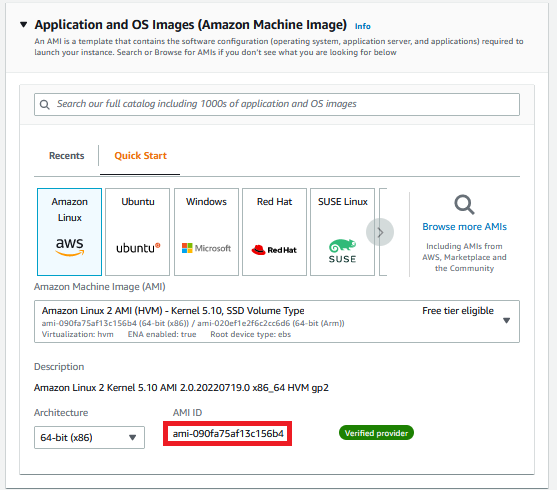
We will use this AMI ID to create an EC2 instance. Run the below to store it in a variable.
AMI_ID=ami-090fa75af13c156b42. Choose Instance Type
We will simply use t2.micro as the instance type. Let’s store this in a variable.
INSTANCE_TYPE=t2.micro3. Create Key-Pair
a) We will create a key pair to use. We will name it my-key-pair.
aws ec2 create-key-pair \
    --key-name my-key-pair \
    --query 'KeyMaterial' \
    --output text > my-key-pair.pem
This stores the key pair in a file named my-key-pair.pem in the current directory.
b) Next we need to correct the permissions of the file.
chmod 400 my-key-pair.pem4. Create Security Group
a) Let’s first create a security group named my-web-sg with description Web security group and store the ID in a variable.
SECURITY_GROUP=$(aws ec2 create-security-group \
    --group-name "my-web-sg" \
    --description "Web security group" \
    --query 'GroupId' \
    --output text) && \
echo "Security group created with id $SECURITY_GROUP"
b) Now, let’s add inbound rules to the security group. We will add rules for SSH, HTTP, and HTTPS. First, let’s add SSH rule.
aws ec2 authorize-security-group-ingress \
    --group-id $SECURITY_GROUP \
    --protocol tcp \
    --port 22 \
    --cidr 0.0.0.0/0
c) Now add HTTP rule.
aws ec2 authorize-security-group-ingress \
    --group-id $SECURITY_GROUP \
    --protocol tcp \
    --port 80 \
    --cidr 0.0.0.0/0
d) Finally, add HTTPS rule.
aws ec2 authorize-security-group-ingress \
    --group-id $SECURITY_GROUP \
    --protocol tcp \
    --port 443 \
    --cidr 0.0.0.0/0
5. Choose Subnet
Let’s choose the subnet corresponding to us-east-1a availability zone and store it in a variable
SUBNET_ID=$(aws ec2 describe-subnets \
    --filters "Name=availability-zone,Values=us-east-1a" \
    --query "Subnets[0].SubnetId" --output text) && \
    echo "Subnet ID for us-east-1a: $SUBNET_ID"
6, 7, 8. Associate Public IP, Tag the instance, Configure Storage
We will directly configure these in out final command
9. Launch the instance
INSTANCE_ID=$(aws ec2 run-instances \
    --image-id $AMI_ID \
    --count 1 \
    --instance-type $INSTANCE_TYPE \
    --key-name my-key-pair \
    --security-group-ids $SECURITY_GROUP \
    --subnet-id $SUBNET_ID \
    --associate-public-ip-address \
    --tag-specifications 'ResourceType=instance,Tags=[{Key=Name,Value=my-ec2-instance}]' \
    --block-device-mappings '[{"DeviceName":"/dev/xvda","Ebs":{"VolumeSize":20,"VolumeType":"gp2"}}]' \
    --query 'Instances[0].InstanceId' \
    --output text) && \
echo "Instance launched with id $INSTANCE_ID"
Get the instance IP address
INSTANCE_IP=$(aws ec2 describe-instances \
    --instance-ids $INSTANCE_ID \
    --query "Reservations[0].Instances[0].PublicIpAddress" --output text) && \
    echo "EC2 instance myServer1 IP: $INSTANCE_IP"
Logging into the EC2 instance
a) With he IP address, we can log into the instance. Open a terminal and run the following command to log into the instance.
ssh -i my-key-pair.pem ec2-user@$INSTANCE_IPYou may be asked for confirmation similar to below, type Yes and press enter.
The authenticity of host '54.173.196.189 (54.173.196.189)' can't be established.
ECDSA key fingerprint is SHA256:jm9pK6nGCsOVkQKfeQTG080hrb3G8Y2k1jeDwkNF4Og.
Are you sure you want to continue connecting (yes/no/[fingerprint])?
This should log you into the instance.
Need help?
Start a discussion on GitHub if you’ve got questions or improvements. Open discussions →