Run Selenium in AWS Lambda for UI testing
A guide about how to run selenium using headless chrome & chromium webdriver to automate UI testing
On this page
[LAST UPDATED: 29-July-2022]
Let me begin by expressing my frustration 😡😡😡 with the fact that AWS doesn’t have a pre-configured selenium image for Lambda on their public ECR marketplace. Selenium is the go-to tool for UI testing and for building many kinds of bots but running it on Lambda is complicated.
The easiest method is to use SAM CLI for Docker for Lambda to create an image with Selenium, Chrome / Chromium headless and webdriver, but given the way Lambda restricts the environment making it work on Selenium is quite difficult but not impossible.
In this tutorial I will provide a guide on how to do exactly that.
Prerequisites
Follow these instructions to setup your development environment.
It will guide you to install and configure AWS CLI & SAM CLI.
Create the app
Follow the instructions in this guide to create Lambda with Docker.
Your folder structure should look like below.
.
├── README.md
├── __init__.py
├── events
│   └── event.json
├── hello_world
│   ├── Dockerfile
│   ├── __init__.py
│   ├── app.py
│   └── requirements.txt
├── template.yaml
└── tests
    ├── __init__.py
    └── unit
        ├── __init__.py
        └── test_handler.py
Customising the app
First, change the name of hello-world directory to src.
init.py
Both the __init__.py files should be empty
Events: events/event.json
Leave the contents of the event.json file unchanged.
Application: src/app.py
We write a simple Python program that uses selenium webdriver to scape a website.
Change the contents of the file to below.
## Run selenium and chrome driver to scrape data from cloudbytes.dev
import time
import json
import os.path
from selenium import webdriver
from selenium.webdriver.chrome.service import Service
from selenium.webdriver.common.by import By
from selenium.webdriver.chrome.options import Options


def handler(event=None, context=None):
    chrome_options = webdriver.ChromeOptions()
    chrome_options.binary_location = "/opt/chrome/chrome"
    chrome_options.add_argument("--headless")
    chrome_options.add_argument("--no-sandbox")
    chrome_options.add_argument("--disable-dev-shm-usage")
    chrome_options.add_argument("--disable-gpu")
    chrome_options.add_argument("--disable-dev-tools")
    chrome_options.add_argument("--no-zygote")
    chrome_options.add_argument("--single-process")
    chrome_options.add_argument("window-size=2560x1440")
    chrome_options.add_argument("--user-data-dir=/tmp/chrome-user-data")
    chrome_options.add_argument("--remote-debugging-port=9222")
    #chrome_options.add_argument("--data-path=/tmp/chrome-user-data")
    #chrome_options.add_argument("--disk-cache-dir=/tmp/chrome-user-data")
    chrome = webdriver.Chrome("/opt/chromedriver", options=chrome_options)
    chrome.get("https://cloudbytes.dev/")
    description = chrome.find_element(By.NAME, "description").get_attribute("content")
    print(description)
    return {
        "statusCode": 200,
        "body": json.dumps(
            {
                "message": description,
            }
        ),
    }
Python Dependencies: src/requirements.txt
Capture the app dependencies in requirements.txt
selenium
requests
pandas
Chrome dependencies: src/chrome-deps.txt
Create a file named src/chrome-deps.txt with the following contents
acl adwaita-cursor-theme adwaita-icon-theme alsa-lib at-spi2-atk at-spi2-core
atk avahi-libs cairo cairo-gobject colord-libs cryptsetup-libs cups-libs dbus
dbus-libs dconf desktop-file-utils device-mapper device-mapper-libs elfutils-default-yama-scope
elfutils-libs emacs-filesystem fribidi gdk-pixbuf2 glib-networking gnutls graphite2
gsettings-desktop-schemas gtk-update-icon-cache gtk3 harfbuzz hicolor-icon-theme hwdata jasper-libs
jbigkit-libs json-glib kmod kmod-libs lcms2 libX11 libX11-common libXau libXcomposite libXcursor
libXdamage libXext libXfixes libXft libXi libXinerama libXrandr libXrender libXtst libXxf86vm libdrm
libepoxy liberation-fonts liberation-fonts-common liberation-mono-fonts liberation-narrow-fonts
liberation-sans-fonts liberation-serif-fonts libfdisk libglvnd libglvnd-egl libglvnd-glx libgusb
libidn libjpeg-turbo libmodman libpciaccess libproxy libsemanage libsmartcols libsoup libthai libtiff
libusbx libutempter libwayland-client libwayland-cursor libwayland-egl libwayland-server libxcb
libxkbcommon libxshmfence lz4 mesa-libEGL mesa-libGL mesa-libgbm mesa-libglapi nettle pango pixman
qrencode-libs rest shadow-utils systemd systemd-libs trousers ustr util-linux vulkan
vulkan-filesystem wget which xdg-utils xkeyboard-config
Dockerfile: src/Dockerfile
Change the contents of the file to below.
FROM public.ecr.aws/lambda/python:3.9 as stage

# Hack to install chromium dependencies
RUN yum install -y -q sudo unzip

# Find the version of latest stable build of chromium from below
# https://omahaproxy.appspot.com/
# Then follow the instructions here in below URL
# to download old builds of Chrome/Chromium that are stable
# Current stable version of Chromium
ENV CHROMIUM_VERSION=1002910


# Install Chromium
COPY install-browser.sh /tmp/
RUN /usr/bin/bash /tmp/install-browser.sh

FROM public.ecr.aws/lambda/python:3.9 as base

COPY chrome-deps.txt /tmp/
RUN yum install -y $(cat /tmp/chrome-deps.txt)

# Install Python dependencies for function
COPY requirements.txt /tmp/
RUN python3 -m pip install --upgrade pip -q
RUN python3 -m pip install -r /tmp/requirements.txt -q


COPY --from=stage /opt/chrome /opt/chrome
COPY --from=stage /opt/chromedriver /opt/chromedriver
COPY app.py ${LAMBDA_TASK_ROOT}

CMD [ "app.handler" ]
Script to install browser: src/install-browser.sh
Create a file at src/install-browser.sh. We will use a simple shell script to install the latest Chrome and Chrome webdriver.
#!/bin/bash


echo "Downloading Chromium..."
curl "https://www.googleapis.com/download/storage/v1/b/chromium-browser-snapshots/o/\
Linux_x64%2F$CHROMIUM_VERSION%2Fchrome-linux.zip?generation=1652397748160413&alt=media" > /tmp/chromium.zip

unzip /tmp/chromium.zip -d /tmp/
mv /tmp/chrome-linux/ /opt/chrome

curl "https://www.googleapis.com/download/storage/v1/b/chromium-browser-snapshots/o/\
Linux_x64%2F$CHROMIUM_VERSION%2Fchromedriver_linux64.zip?generation=1652397753719852&alt=media" > /tmp/chromedriver_linux64.zip

unzip /tmp/chromedriver_linux64.zip -d /tmp/
mv /tmp/chromedriver_linux64/chromedriver /opt/chromedriver
Then run the below command to make the script executable.
chmod +x src/install-browser.shtemplate.yaml
Change the contents to below. Based on the complexity of your app, you may need to increase the memory and timeout values under Globals:Function.
AWSTemplateFormatVersion: '2010-09-09'
Transform: AWS::Serverless-2016-10-31
Description: >
  python3.9

  Sample SAM Template for selenium

# More info about Globals: https://github.com/awslabs/serverless-application-model/blob/master/docs/globals.rst
Globals:
  Function:
    Timeout: 120
    MemorySize: 2048

Resources:
  SeleniumFunction:
    Type: AWS::Serverless::Function
    Properties:
      PackageType: Image
      Architectures:
        - x86_64
      Events:
        Selenium:
          Type: Api
          Properties:
            Path: /selenium
            Method: get
    Metadata:
      Dockerfile: Dockerfile
      DockerContext: ./src
      DockerTag: python3.9-v1

Outputs:
  # ServerlessRestApi is an implicit API created out of Events key under Serverless::Function
  # Find out more about other implicit resources you can reference within SAM
  # https://github.com/awslabs/serverless-application-model/blob/master/docs/internals/generated_resources.rst#api
  SeleniumApi:
    Description: "API Gateway endpoint URL for Prod stage for Seleniumc function"
    Value: !Sub "https://${ServerlessRestApi}.execute-api.${AWS::Region}.amazonaws.com/Prod/selenium/"
  SeleniumFunction:
    Description: "Selenium Lambda Function ARN"
    Value: !GetAtt SeleniumFunction.Arn
  SeleniumFunctionIamRole:
    Description: "Implicit IAM Role created for Selenium function"
    Value: !GetAtt SeleniumFunctionRole.Arn
Build & test the app
To build the app run,
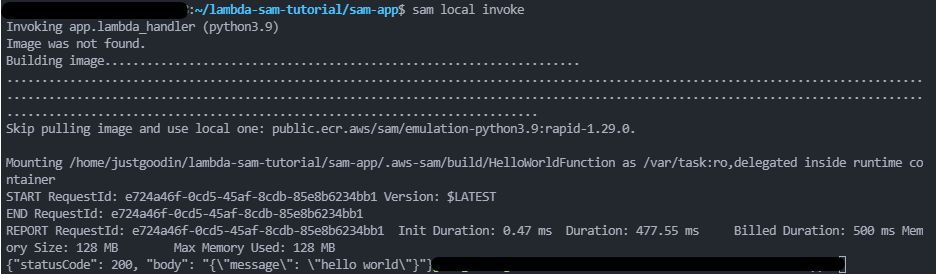
sam buildTo test run
sam local invokeOutput
You should see something similar to below depending on the URL you scraped
Deploy the app
To deploy the app for the first time run,
sam deploy --guidedThis will start the interactive deployment to Lambda. You can use options as shown below.
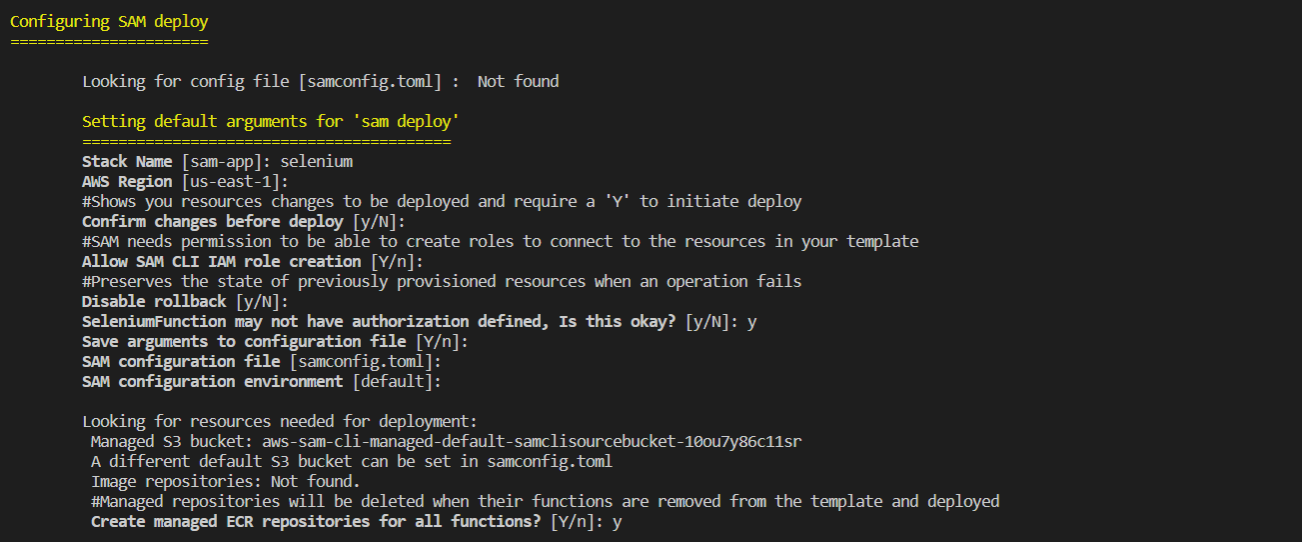
This will also create a samconfig.toml file that will contain these configurations.
Next time after you build the app, just run sam deploy to deploy the app.
After a successful deployment, you should see something similar to below. Note the API URL in the output at the bottom.
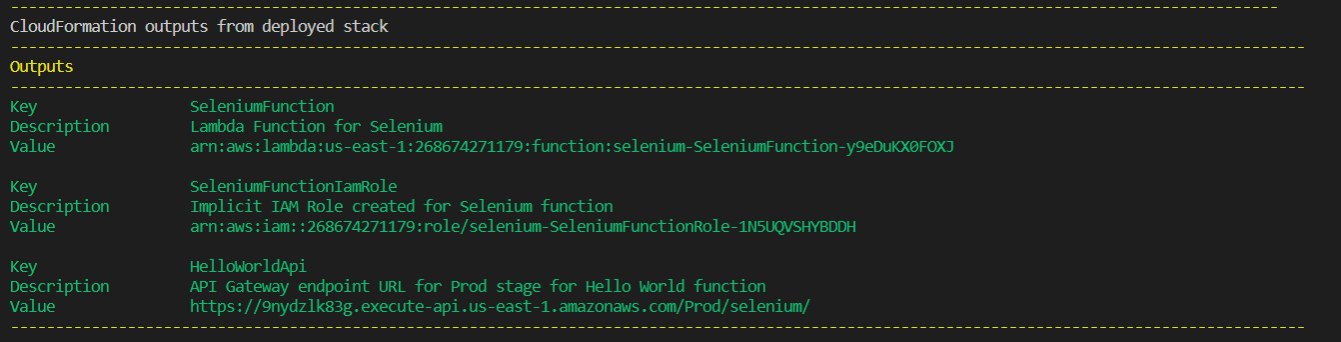
Test the app
Using the API URL from the output, you can test the app by running
curl -X GET <API URL>Cleanup
To delete the app, run sam delete.
Using the GitHub repository directly
You need AWS SAM CLI installed and AWS credentials configured.
Open your terminal and run the following command to clone the repository.
git clone https://github.com/rehanhaider/selenium-in-aws-lambda.gitNavigate to the app directory.
cd selenium-in-aws-lambda/seleniumBuild the app.
sam buildTest the app locally.
sam local invokeDeploy the app to AWS.
sam deploy --guidedNeed help?
Start a discussion on GitHub if you’ve got questions or improvements. Open discussions →