Run AWS Lambda using custom docker container
[LAST UPDATED: 29-July-2022]
I wrote about building and deploying a AWS Lambda using SAM CLI previously.
In this guide, we try to run a Lambda function inside a container.
Why run Lambda in Docker?
For a very simple reason, Lambda runtimes are standardised environments where you can only use what they provide and they do not provide a lot. E.g. if your application required any binary to be installed you coudn't do that on Lambda.
But in 2020 Re:invent, AWS launched Container Image Support for Lambda for container images up to 10 GB in size. While for this may not be important for "one-off functions", but for many use cases such as machine learning models etc, the developmental workflow typically includes Dockers and that is where it gets tricky deploying them to AWS Lambda.
Setting up the development environment.
You need Docker & VSCode to be installed on your system for this guide. Download fromt he provided links and install.
Then follow the following steps.
Step 1: Install Python using these instructions.
Step 2: Install AWS CLI
Step 3: Install SAM CLI
Step 4: Configure AWS & AWS CLI
Create a new app
Run the below in your terminal to create a new SAM application
sam init --package-type Image
This will start the interactive session to create your app. Choose Option as per below
Which template source would you like to use?
        1 - AWS Quick Start Templates
        2 - Custom Template Location
Choice: 1

Choose an AWS Quick Start application template
        1 - Hello World Example
        2 - Machine Learning
Template: 1

Which runtime would you like to use?
        1 - dotnet6
        2 - dotnet5.0
        3 - dotnetcore3.1
        4 - go1.x
        5 - java11
        6 - java8.al2
        7 - java8
        8 - nodejs16.x
        9 - nodejs14.x
        10 - nodejs12.x
        11 - python3.9
        12 - python3.8
        13 - python3.7
        14 - python3.6
        15 - ruby2.7
Runtime: 11

Based on your selections, the only dependency manager available is pip.
We will proceed copying the template using pip.

Would you like to enable X-Ray tracing on the function(s) in your application?  [y/N]:

Project name [sam-app]: selenium

Cloning from https://github.com/aws/aws-sam-cli-app-templates (process may take a moment)

    -----------------------
    Generating application:
    -----------------------
    Name: selenium
    Base Image: amazon/python3.9-base
    Architectures: x86_64
    Dependency Manager: pip
    Output Directory: .

    Next steps can be found in the README file at ./selenium/README.md
Understanding the SAM generated application template
First, go to the selenium directory.
cd selenium
You should see the following files
.
├── README.md
├── __init__.py
├── events
│   └── event.json
├── hello_world
│   ├── Dockerfile
│   ├── __init__.py
│   ├── app.py
│   └── requirements.txt
├── template.yaml
└── tests
    ├── __init__.py
    └── unit
        ├── __init__.py
        └── test_handler.py
Compared to the standard Lambda example, this has an additional file, the Dockerfile that contains the instructions to build the container where the lambda will be executed.
FROM public.ecr.aws/lambda/python:3.9

COPY app.py requirements.txt ./

RUN python3.9 -m pip install -r requirements.txt -t .

# Command can be overwritten by providing a different command in the template directly.
CMD ["app.lambda_handler"]
The first thing you notice is, this image is building on top of an image from AWS's pubic container registry.
NOTE: You can also use non-AWS images such as those based on Alpine or Debian, however, the container image must include Lambda Runtime API. So if you use a non-AWS image, you will need to add them manually otherwise your app will not work.
And the final line is responsible for running the lambda_handler() function that in defined under twitter/hello_world/app.py.
Build the project
To build the app, run the following
sam build
You need Docker & Python3.9 to be installed for this to work
Test the build
To test if you application is working correctly, run
sam local invoke
Again, you need Docker & Python3.9 to be installed for this to work
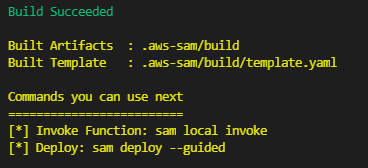
You should see the following output:

Deploy the project
Now there are three more steps that needs to be performed, but in our case, SAM CLI will do them in one go.
These steps are (again, we don't need to do them if using SAM CLI) 1. We need to rename the tag of our docker container to push it to the repository. 2. Login from Docker CLI to ECR repository 3. Push the image to ECR repository
All we need to do now is
sam deploy --guided
This will start an interactive delployment session, choose options as below (blank means leave the defaults)
Configuring SAM deploy
======================

        Looking for config file [samconfig.toml] :  Not found

        Setting default arguments for 'sam deploy'
        =========================================
        Stack Name [sam-app]: hello-world
        AWS Region [us-east-1]:
        #Shows you resources changes to be deployed and require a 'Y' to initiate deploy
        Confirm changes before deploy [y/N]:
        #SAM needs permission to be able to create roles to connect to the resources in your template
        Allow SAM CLI IAM role creation [Y/n]: y
        #Preserves the state of previously provisioned resources when an operation fails
        Disable rollback [y/N]:
        HelloWorldFunction may not have authorization defined, Is this okay? [y/N]: y
        Save arguments to configuration file [Y/n]:
        SAM configuration file [samconfig.toml]:
        SAM configuration environment [default]:
After that, if will further ask for confirmation on creating ECR repository:
Create managed ECR repositories for all functions? [Y/n]: Y
This will deploy your app to AWS and you should see a final confirmation output similar to below. Note the URL of the API highlighted in the output.
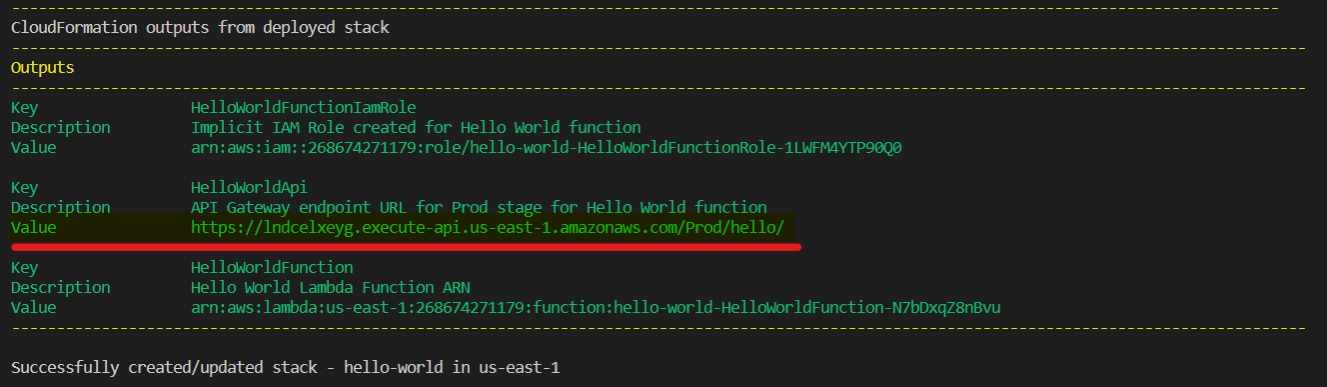
Test the deployed app
Fetch the URL of the API from the output above and send a GET request to the API using the below command.
curl -X GET https://lndcelxeyg.execute-api.us-east-1.amazonaws.com/Prod/hello
In response, you should see:
{
  "message": "hello world!"
}
Clean up and delete the app
To delete the app, run the following
sam delete
You will be asked for below confirmations:
Are you sure you want to delete the stack hello-world in the region us-east-1 ? [y/N]: y
  Are you sure you want to delete the folder hello-world in S3 which contains the artifacts? [y/N]: y
  Found ECR Companion Stack hello-world-20953121-CompanionStack

  Do you you want to delete the ECR companion stack hello-world-20953121-CompanionStack
  in the region us-east-1 ? [y/N]: y

  ECR repository helloworld20953121/helloworldfunction19d43fc4repo may not be empty.
  Do you want to delete the repository and all the images in it ? [y/N]: y
You app is deleted.