Build & Deploy serverless apps on AWS with SAM CLI
AWS changed the game in 2015 when they launched AWS Lambda which enabled developers build applications without needed a server.
Since then, Lambda and Serverless in general has grown in leaps and bounds with launch of API Gateway, among many other services that allows developers to build full-fledged serverless apps.
While CloudFormation (an IaaC tool) has existed for years, it is usually cumbersome to write CloudFormation templates with simplest ones going upto hundres of lines of codes. This had led to developers preferring third-party tools such as Terraform or Pulumi, but with AWS launching their SAM CLI that is changing fast.
Within AWS Ecosystem, there are a plethora of options available, the details of which we will cover in another lesson, but the two that we will use for this lesson are
- AWC CLI: This allows a developer to manage all of their AWS services using CLI
- AWS SAM-CLI: This is a separate CLI tool that covers a subset of AWS CLI but is also a wrapper on CloudFormation and in fact generate a CloudFormation template as part of its build process.
In this tutorial, we will use AWS CLI and SAM-CLI to build a simple Lambda application using Python 3.8 and deploy it to AWS.
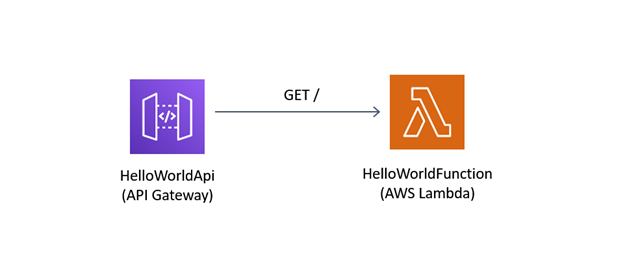
The application of our choice is a Lambda function behind API Gateway that will return Hello World message when invoked.
Setting up the development environment
Download and install Python 3.9 for your OS from Python Website.
IMPORTANT: The latest supported Python version on AWS Lambda is 3.8, thus you need 3.9 to be able to build your Lambda application
You can refer to this tutorial if you need help in installing python correctly.
Check your Python version to confirm
python --version
Install AWS CLI
Installation method varies by OS. Steps below.
On Windows Download the 64-bit installer and run to install.
On Linux, run
curl "https://awscli.amazonaws.com/awscli-exe-linux-x86_64.zip" -o "awscliv2.zip" \
   && unzip awscliv2.zip
Then Install the AWS CLI by running the following command:
sudo ./aws/install
On MacOS Download the MacOS PKG and run to install.
To check if the installation was successful, run a version check
aws --version
Install AWS SAM CLI
Again, installation varies by Operating System, choose from below as appropriate.
On Windows Download and run the 64-bit installer.
On Linux, run the below
wget "https://github.com/aws/aws-sam-cli/releases/latest/download/aws-sam-cli-linux-x86_64.zip" \
   -O "awssam.zip" \
   && unzip awssam.zip -d sam \
   && sudo ./sam/install
On MacOS run
brew tap aws/tap
brew install aws-sam-cli
Verify the installation by running a version check
sam --version
Configuring AWS & AWS CLI
Both AWS CLI and SAM CLI relies on "Programmatic Access" credentials. So you will need to either create a new user or use your own Access Keys.
Ideally, create a user with only programmatic access as shown below.
Create a new admin user with programmatic access
- Login to your AWS Console Home and navigate to IAM
- On the left pane, click on Users
- Then Click on Add users
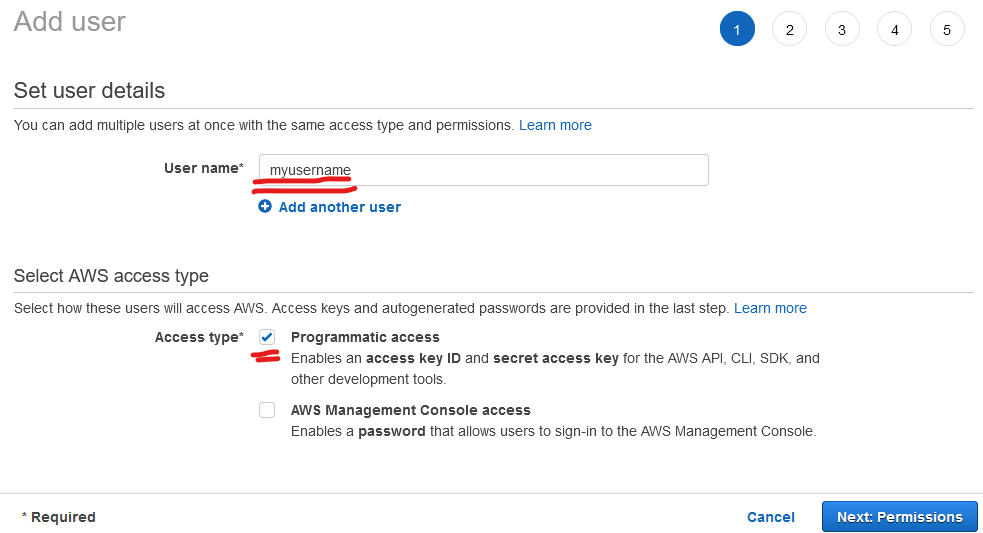
- Choose a username & select only Programmatic access under Select AWS access type, then click Next: Permissions
Then click on Attach existing policies directly and choose AdministratorAccess then click on Next: Tags.
Leave the tags blank for now, and click on Next: Review then click on Create user. This will create a new user.
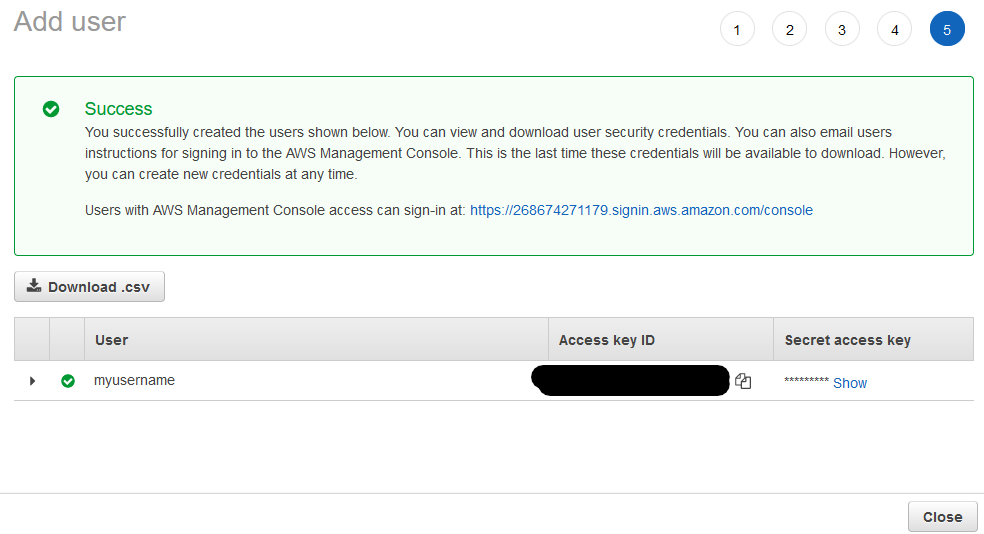
Keep this window open for now, and notice the Access key ID & Secret access key. This will be needed in next step.
WARNING: Never store this credentials anywhere or share them with anyone. An attacker can user your credentials to create AWS resources in your account. If you need to reconfigure, you can generate a new credentials from IAM screen.
Configure AWS CLI
Open a terminal window and run the below to start the configuration
aws configure
This will start an interactive session, copy paste your access keys and secret access keys when prompted
aws configure
AWS Access Key ID [None]: XXXXXXXXXXXXXXXXXXXX
AWS Secret Access Key [None]: XXXXXXXXXXXXXXXXXXXXXXX
Default region name [None]: us-east-1
Default output format [None]:
Create a new app
Now run the below to create a new SAM App
sam init
This will prompt you to choose between Quick Start & Custom Template, choose 1 and press Enter followed by choose Zip (1). Then finally, choose python3.8 (option 2) when asked to choose the runtime as shown below. Leave the name as default (sam-app).
Which template source would you like to use?
        1 - AWS Quick Start Templates
        2 - Custom Template Location
Choice: 1
What package type would you like to use?
        1 - Zip (artifact is a zip uploaded to S3)
        2 - Image (artifact is an image uploaded to an ECR image repository)
Package type: 1

Which runtime would you like to use?
        1 - nodejs14.x
        2 - python3.9
        3 - ruby2.7
        4 - go1.x
        5 - java11
        6 - dotnetcore3.1
        7 - nodejs12.x
        8 - nodejs10.x
        9 - python3.8
        10 - python3.7
        11 - python3.6
        12 - python2.7
        13 - ruby2.5
        14 - java8.al2
        15 - java8
        16 - dotnetcore2.1
Runtime: 2

Project name [sam-app]:

Cloning from https://github.com/aws/aws-sam-cli-app-templates
Once the clone process is complete, you will be prompted to choose the application template, choose 1 - Hello World Example, as shown below
AWS quick start application templates:
        1 - Hello World Example
        2 - EventBridge Hello World
        3 - EventBridge App from scratch (100+ Event Schemas)
        4 - Step Functions Sample App (Stock Trader)
        5 - Elastic File System Sample App
Template selection: 1

    -----------------------
    Generating application:
    -----------------------
    Name: sam-app
    Runtime: python3.8
    Dependency Manager: pip
    Application Template: hello-world
    Output Directory: .

    Next steps can be found in the README file at ./sam-app/README.md
Understandign the project structure
Go to the sam-app directory
cd sam-app
You should see the following files
.
├── README.md
├── __init__.py
├── events
│   └── event.json
├── hello_world
│   ├── __init__.py
│   ├── app.py
│   └── requirements.txt
├── template.yaml
└── tests
The key files to look at are 1. event.json: Invocation events that can be used to invoke the Lambda function 2. hello_world/app.py: Contains the code for the Lambda function 3. template.yaml: The SAM's template that declare the AWS resources that will be used for this app
Building the app
With SAM CLI, building the app is easy, just run
sam build
NOTE: If your Python versio is not 3.8, you will get an error on the build. Reinstall Python 3.8 version.
You should get a Build Succeeded message along with a few other debug messages, if the build completed successfully. You can see the built lambda function in .aws-sam folder which will contain the dependencies and the app.py application.
Deploy the app
Now to deploy the app run
sam deploy --guided
This will first throw a warning
Looking for config file [samconfig.toml] : Not found
But then if will continue and ask you a few questions, choose as per below
        Setting default arguments for 'sam deploy'
        =========================================
        Stack Name [sam-app]:
        AWS Region [us-east-1]:
        #Shows you resources changes to be deployed and require a 'Y' to initiate deploy
        Confirm changes before deploy [y/N]: y
        #SAM needs permission to be able to create roles to connect to the resources in your template
        Allow SAM CLI IAM role creation [Y/n]: y
        #Preserves the state of previously provisioned resources when an operation fails
        Disable rollback [y/N]:
        HelloWorldFunction may not have authorization defined, Is this okay? [y/N]: y
        Save arguments to configuration file [Y/n]:
        SAM configuration file [samconfig.toml]:
        SAM configuration environment [default]:
If there are any unreferenced ECR repositories, it will ask you to confirm the deletion.
Delete the unreferenced repositories listed above when deploying? [y/N]: y
SAM CLI will print out a lot of debug information, but you should get a prompt asking for confirmation
Deploy this changeset? [y/N]: y
Finally you app is deployed. You should see a final output similar to the below
CloudFormation outputs from deployed stack
---------------------------------------------------------------------------------------------------------------------------
Outputs
---------------------------------------------------------------------------------------------------------------------------
Key                 HelloWorldFunctionIamRole
Description         Implicit IAM Role created for Hello World function
Value               arn:aws:iam::268674271179:role/sam-app-HelloWorldFunctionRole-M6IZJ8JLWL61

Key                 HelloWorldApi
Description         API Gateway endpoint URL for Prod stage for Hello World function
Value               https://jkasd6ja8.execute-api.us-east-1.amazonaws.com/Prod/hello/

Key                 HelloWorldFunction
Description         Hello World Lambda Function ARN
Value               arn:aws:lambda:us-east-1:1364247115578:function:sam-app-HelloWorldFunction-AxJdejTmhKx3
---------------------------------------------------------------------------------------------------------------------------

Successfully created/updated stack - sam-app in us-east-1
Test the app
In the output above, note the URL in the format https://<api-id>.execute-api.us-east-1.amazonaws.com/Prod/hello/, you should have got a similar URL, copy that and run the below
curl https://<api-id>.execute-api.us-east-1.amazonaws.com/Prod/hello/
This should produce the output
{"message": "hello world"}
Congratulations, you just deployed your Serverless app using SAM-CLI. Go to AWS Console and navigate to Lambda and see the app configuration.
Delete the App
Now you have created the app but SAM CLI doesn't provide you a method to delete it. For this we will use AWS CLI.
aws cloudformation list-stacks
Stack is basically a cloudformation term for a combination of resources that you've created together. This should list all of your stacks + 2 more (one for AWS CLI and another for SAM CLI).
Notice the first one has StackName value as sam-app, we will now delete this.
If you get stuck press 'q' to exit.
Now runt he below to delete the app
aws cloudformation delete-stack --stack-name sam-app
Confirm deletion
List all your stacks again
aws cloudformation list-stacks
You should still see the stack sam-app, however, if notice the StackStatus key, this should be DELETE_COMPLETE.